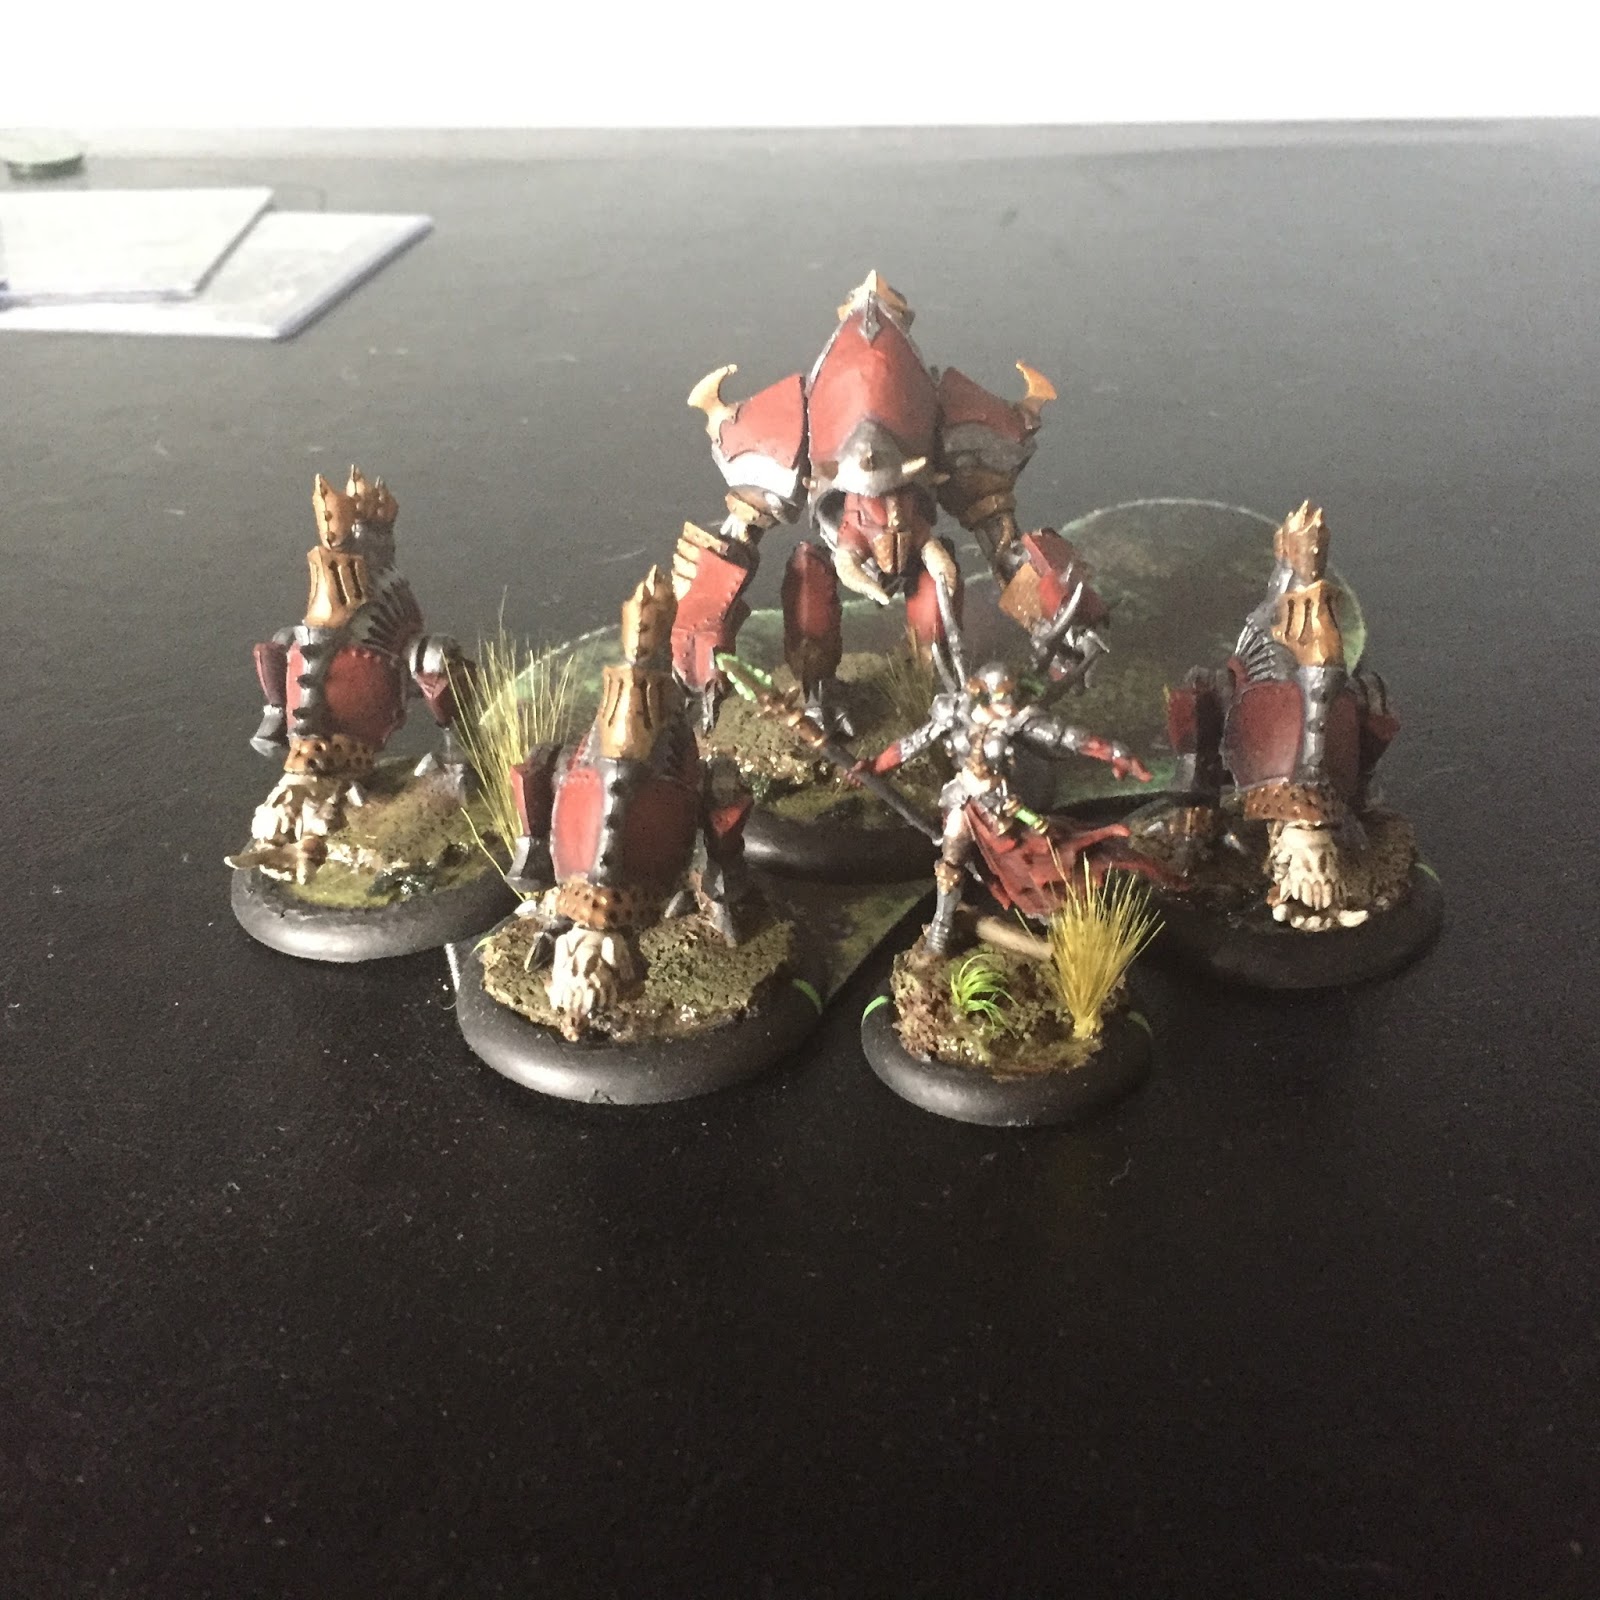
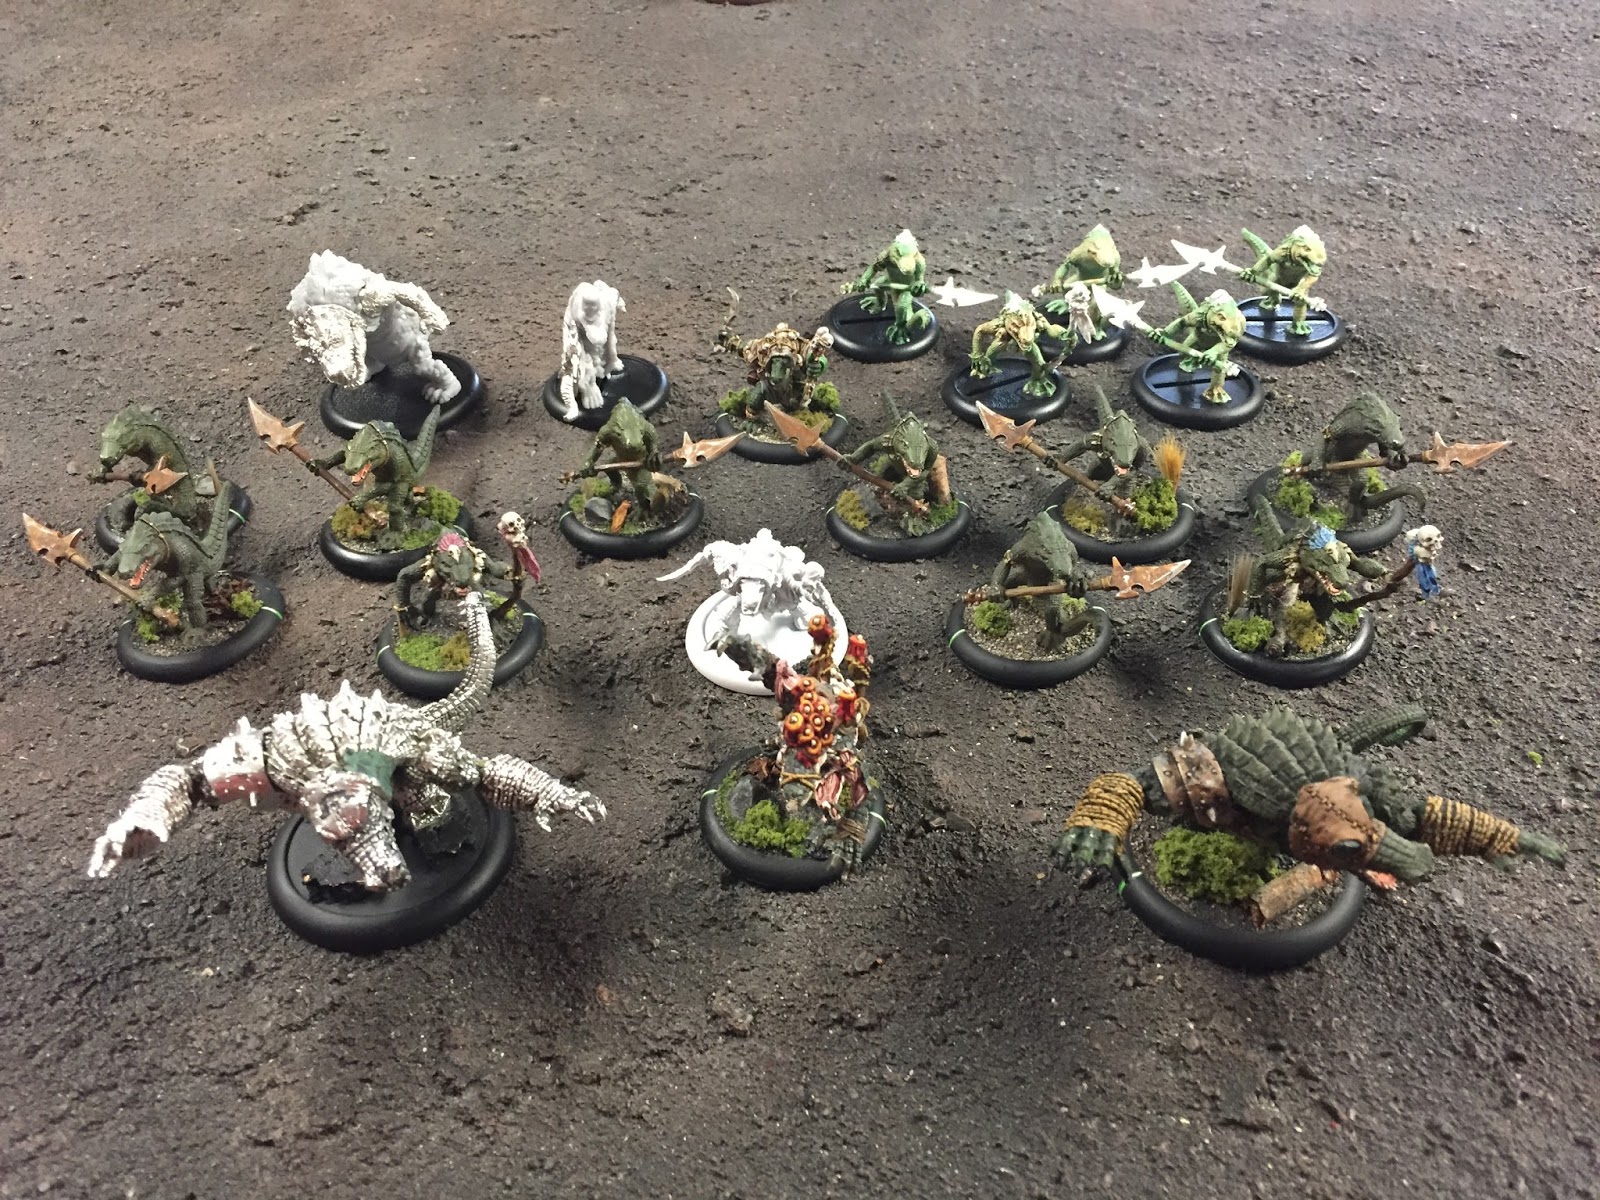
I finally got my Heavy Warbeasts back from painting - they look gorgeous!!! - and gladly pulled out the Farrow for a few games to shake the rust off. Let's just say they were really rusty ;)
For this game, my list consisted of my favorite 'caster, Lord Carver. His list was:
Theme: The Thornfall Alliance
Lord Carver, BMMD, Esq. III [+28]
- War Hog [15]
- War Hog [15]
- War Hog [15]
- Battle Boar [7]
- Battle Boar [7]
Maximus [4]
Farrow Brigands [15]
- Farrow Brigand Warlord [0]
Farrow Brigands [15]
- Farrow Brigand Warlord [0]
Farrow Razorback Crew [5]
I was just starting to use this list when I sent my Heavy Hogs away, and really like the potential. Carver gives those Brigands a +3 attack swing on their Prey targets, which makes them RAT 8! And Maximus has the potential to munch a large group of infantry (I've never actually had the chance, though) during Feat turn. The Razorbacks are iffy with their RAT 4 (RAT 5 when close to Carver), but really they are there to provide a couple of shots and give me free Warlords.
My opponent was playing Borka2 and had this picture he had found on the internet that he wanted to "recreate" once I got my Pigs back.
His list was as follows:
Borka, Vengeance of the Rimeshaws [+29]
- Rok [21]
- Dire Troll Mauler [15]
- Troll Bouncer [9]
Totem Hunter [6]
Wrong Eye [17]
- Snapjaw [0]
Trollkin Fennblades [15]
- Fennblade Officer/Drummer [5]
The scenario we were playing was Take and Hold. The crates were obstacles, and the center pile was an obstruction. Both buildings were obstacles, and the ruin was rubble. Minions won the initial roll-off, and chose the side with the buildings.
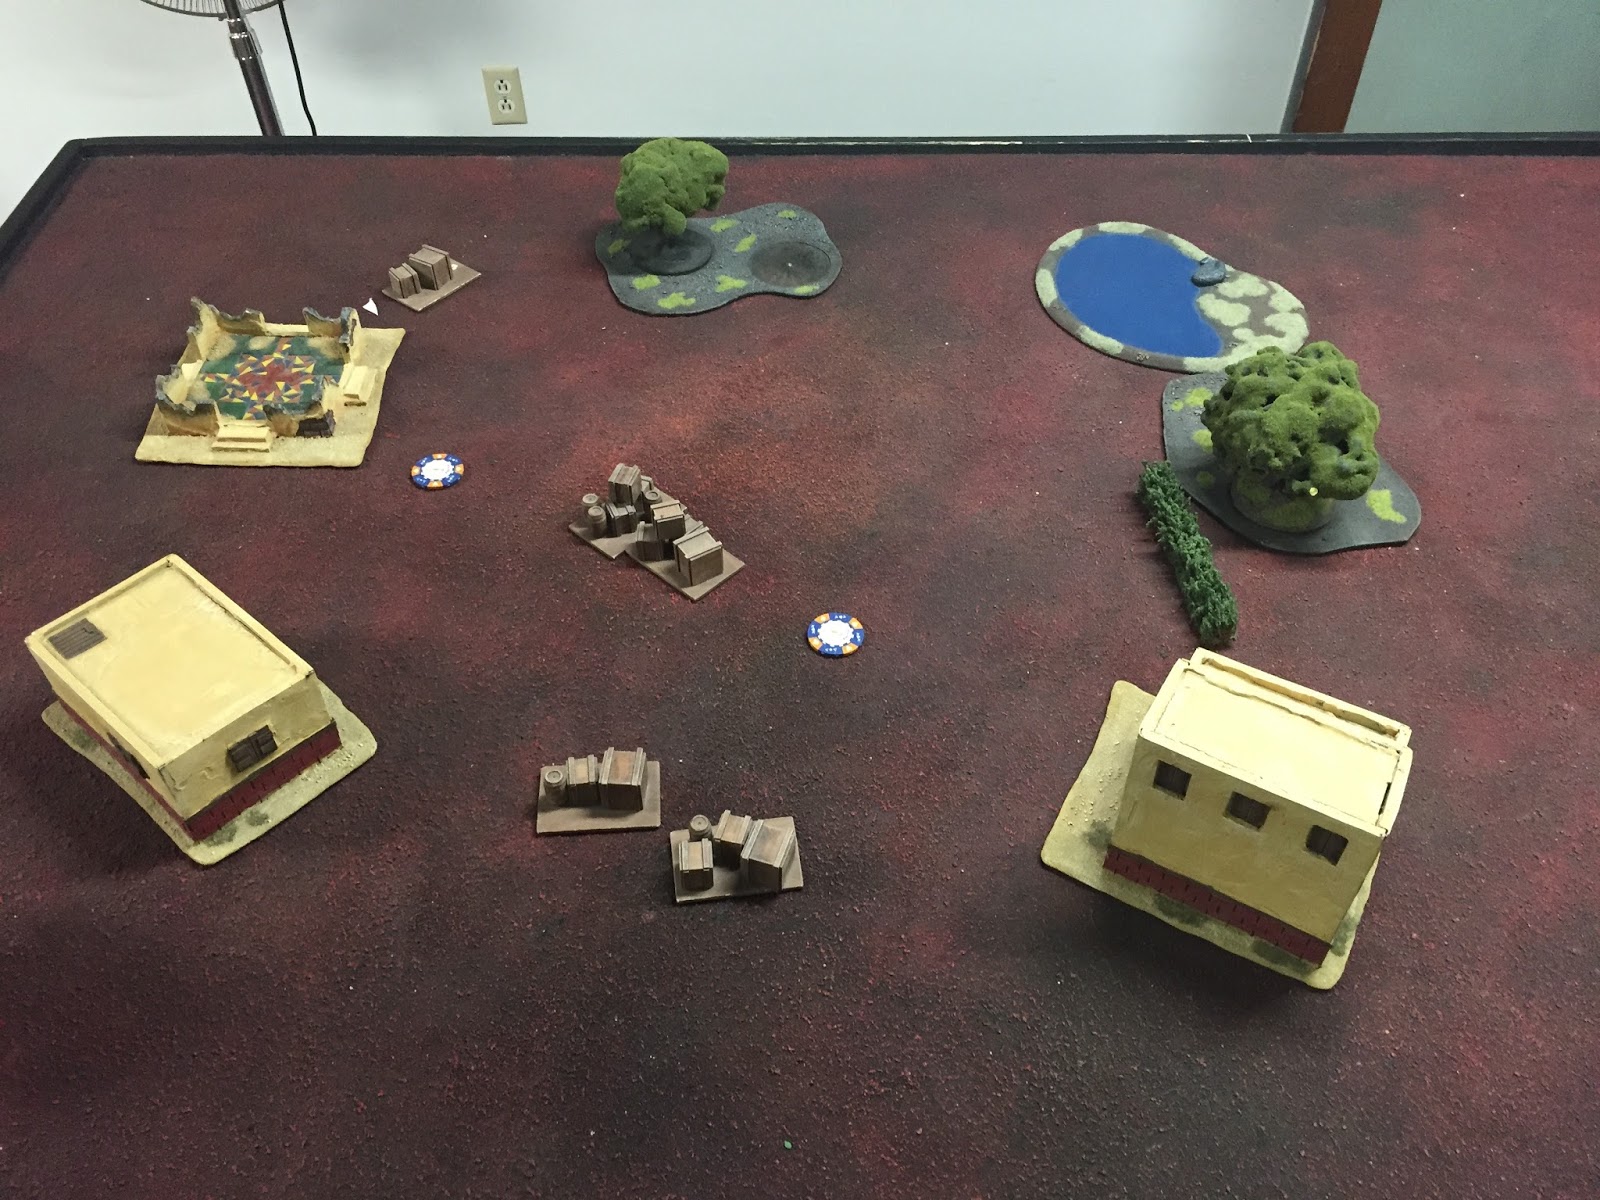
Trollbloods - Deployment
The Fennblades deployed on the right, bunched between the central forest and water. Borka and his Trolls deployed on the other side of the forest with Wrong Eye and Snapjaw beside them. The Totem Hunter then deployed in the central woods.
Minions - Deployment
First unit of brigands deploy behind the building, with the intention of running around the building. This ended up being a faulty assumption. A War Hog deployed on that flank, with a Battle Boar for Primal support. Both Razorbacks deploy behind the line of crates, and Maximus deploys next to them. In the right gap, the other two War Hogs deploy with a Battle Boar and Lord Carver. Behind them deploy the Brigands. The lefthand brigands put Prey on a Mauler, and the righthand brigands put Prey on the Fennblades.
Trollbloods - Turn 1:
Totem Hunter runs up behind the pile of crates in the middle. Fennblades run up and spread out. Rok runs up behind the Fennblades. Maulers run up, with Wrong Eye and Snapjaw behind them. Borka moves up and casts Snow Shroud on the Fennblades and drops a Fury.
I forgot to take a picture ... :(
Minions - Turn 1:
Carver starts the turn off, and realizes pretty quickly he deployed too far to the right - the left hand portion of his battle group is not in control. Oh well, easily fixed (but I've been doing this a lot lately, need to pay more attention). Carver casts Batten Down the Hatches and Mobility, and advances towards the center of the table. This gets everybody back into control.
Left side War Hog runs, and the Brigands move up behind him. I had originally planned for them to run around the left side of the house, but for some reason changed my mind. This put a real jam into that side - not good. Battle Boar moves up as well, with the two Razorbacks moving up behind the crates. Maximus enthusiastically ran towards the Totem Hunter (he was the Totem's Prey, if I remember right).
On the right side, Carver realized he was just slightly in the charge range of two Fennblades (13" threat is scary!), so had two War Hogs run up to flank him. The Battle Boar ran up, too, with the Brigands spreading out behind.
Trollbloods - Turn 2:
Borka snags all of his Fury and upkeeps Snow Shroud. Totem Hunter moves around the crates (dang, 7" is a long ways) and engages Maximus - then he jumps over Maximus and lands amidst the Razorbacks! He easily slaughters one unit, and Sprints to engage the second in the back.
The Fennblades advance, using No Quarter to Run/Charge and engage my lines. Two of them take swings at Carver, but do no damage. They then reposition slightly.
Dire Trolls advance towards the left side flag, getting into position to take on that flank.
Rok runs towards the right flag - not to actually do anything with it, but to be in position next turn as well. Borka joins him, casts Battle Charged and then Feats. And now I understand why Snow Shroud was so important - his whole army now causes any model that hits them in melee to become stationary as soon as the attack is resolved! Well, the Trollbloods portion of his army, anyway. We then find out the furthest left Dire Troll is outside of control - ouch!
Bouncer advances up behind the Dire Trolls, and Wrong Eye and Snapjaw advance as well. Wrong Eye casts Star Crossed, Snapjaw Submerges and riles.
Minions - Turn 2:
Carver leeches Fury and goes into the tank. That Feat really puts a damper on my plans, and I spend a long time trying to determine how to handle going stationary. First, my only real targets are the Fennblades, and they are not worth having a War Hog go stationary to kill one. The really hard part is they are also engaging everyone but Maximus across the front lines.
After some serious thought, things start to happen. Brigands move up to swing at the Fennblades on the left. One of them ends movement within 6" of a Dire Troll, and the huge beast charges forward (Battle Charged gives Countercharge). He misses his attack, though. :) Now the Brigands can swing, and they kill the two Fennblades on that side. The problem is that now the Dire Troll blocks the path the War Hog had to the Dire Troll out of Borka's control area. :/ *sigh* - more change of plans.
Maximus moves up and swings, taking out a Fennblade and going stationary. The left side Battle Boar moves over and swings at the Totem Hunter, boosting to hit. He misses and swings again, boosting to hit. He misses, buys an attack, and misses. REALLY?!? The Razorback crew, rather than shooting a Fennblade as planned, turn and swing at the Totem Hunter, missing of course.
Brigands on the right flank, after some serious thought, move up and whack/shoot the Fennblades on that side. Several go stationary, but they clear a path for the Battle Boar. The Battle Boar then runs up and engages Borka and Rok - mainly to be an annoyance that has to be dealt with.
Carver backs up between his two War Hogs as far as possible (still staying within melee range of the Fennblades) and casts Batten Down the Hatches and camps three. His flanking War Hogs blow snot on the Fennblades. The left hand War Hog, after a lot of premeasuring, determines he can't get to Snapjaw without multiple free strikes and moves to engage the backline Fennblades.
Trollbloods - Turn 3:
Borka leeches Fury and lets Snow Shroud drop. The remaining Fennblades shuffle slightly with Vengeance, with two swinging at Carver, again doing nothing, and one putting a serious hurt onto Maximus.
The Fennblades go first, killing Maximus and doing slight damage to the non-guardian War Hog, but they lose the Drummer to a free strike, so no more Reposition.
With Maximus dead, the Totem Hunter switches Prey to the left hand Brigands and jumps, leaving his combat and landing next to the Warlord. Two swings, and the Warlord lies dead.
The Dire Troll in front of those Brigands moves over behind the War Hog, and starts swinging. Due to some bad dice rolls, the Hog lives! And the Trollbloods bad luck continues, as Rok moves around the Battle Boar (taking minimal damage from the free strike) and fails to do anything significant to the right guardian War Hog.
Snapjaw moves up, and through more bad dice rolls, leaves the left hand War Hog (that was already smacked by the Dire Troll) knocked down and on two boxes. He lives!! :)
Borka, now with a clear lane to Carver, decides to go for it and charge in. He moves up, casts Primal - oh wait, Primal can only affect Warbeasts. That is unfortunate for Borka :( He swings with Trauma, misses the initial (charge) attack. Buys an attack, and deals minimal damage. He then realizes Carver has three fury, he has three attacks, and there's no way he is killing Carver. He casts the Bouncer's animus - no knockdown or push - and camps two.
The Bouncer moves up, as does the Dire Troll that was outside of Borka's control, and finally - after lots of premeasuring - Wrong Eye as well, casting Star Crossed to get as many enemy models as possible.
No picture of this turn, to much going on
Carver leeches Fury, and the Battle Boar in the back actually fails to Frenzy! Yeah, get those low dice rolls out early.
Carver then activates, casts Primal on the right hand War Hog, casts Batten Down the Hatches (just in case there's another turn), and Feats. He does take a swing at Borka, but does nothing.
The Battle Boar behind Borka activates, casts Primal, and advances into melee with the Trollblood. Three swings and decent damage leave Borka on no transfers.
The right side Brigands shuffle, getting out of the way of the War Hog, and take a couple swings at Rok. This was a mistake, as Rok is Stumbling Drunk with Borka and he moves around slightly - luckily for me he does not stumble into the location I need that War Hog!
The right hand War Hog moves slightly around Borka to get out of Star Crossed range, and puts two punishing axes into the warlock, killing him.
Victory for Minions!!
Showing posts with label Battle Report. Show all posts
Saturday, April 15, 2017
Wednesday, April 12, 2017
Battle Report #6: Khador (Sorscha) vs Cryx (Deneghra)
Second game with my wife, this time with a better understanding of just how scary Deneghra can be, especially in small games. However, I don't think I will give as much help to my wife, so maybe I can do a little better ;)
Same lists as the first game:
Sorscha
- Destroyer
- Destroyer
Deneghra
- Twitch (Slayer)
- Spew (Defile)
- Gimpy (Deathripper)
- Clank (Deathripper)
The rolloff for first turn was won by me, and I elected to go first.
Khador - Turn 1
In retrospect, I probably should have went second. :/ The Destroyers move on, along with Sorscha. Focus is allocated, but not used. Everybody simply walks forward. Mainly because I am trying to stay as far from Deneghra as possible, until I'm ready to put the smackdown on. Sorscha does cast Wind Rush for +2 DEF.
Cryx - Turn 1
Cryx moves on the board on the left side, moving halfway up the board thanks to how fast they are. Holy crap! Moving 7" on and then running 14" is really huge when the board is only 30" wide. Gimpy runs into the center woods, with Spew moving in behind him (but out of the woods). Clank ran up the left side, approaching the flag. Twitch advanced to 10" away from my Destroyer. Deneghra walked up, and arced a couple boosted Venoms onto Sorscha and the Destroyer, for no real damage.
No picture of this turn.
Khador - Turn 2
So, I kept out of Deneghra's feat range, which was nice, and now lets kill some 'jacks. First, I made a big mistake here. I forgot about Boundless Charge. I knew that Twitch was 10" away, and assumed I wouldn't be able to get to him because I was only SPD 4. However, Boundless Charge gives +2" of movement on the charge, so I could have gotten to him. Then a couple of whacks with my axe and I could have easily dropped the heavy.
Instead, Sorscha hit Gimpy with a boosted Freezing Grip, making the little guy Stationary (and DEF5). The Destroyers then sat still and aimed at him, wanting to remove the arc node. The two shots left Gimpy on only 3 boxes, with cortex and movement out. Not exactly the result I was looking for.
Cryx - Turn 2
This is where my wife completely surprised me. Rather than advancing or charging everything into my 'jacks, she repositioned. Clank moved into base with the flag on the left. Gimpy moved out of the woods to the right, and Spew ran to base the flag on the right. Deneghra moved around the woods, used her Feat, and cast Scourge onto the Destroyer next to Sorscha, knocking them both down. She then hits Sorscha with Crippling Grasp.
Twitch then charged into the Destroyer and tried to whack him. It didn't go well. :)
No picture of this turn, again.
Khador - Turn 3
Hmm, that's not good. I didn't expect her to go for scenario. I need to contest the right flag, or she's going to win by moving Deneghra into base contact (and losing on scenario in a Rumble would be embarrassing). So the right hand Destroyer moves up 2" (his new speed *sigh*) to be (just barely) within 4" and shoots into the cluster of 'jacks and Deneghra. He kills Gimpy, knocks out the head and cortex of Spew, and puts a couple damage boxes onto Deneghra (she ignores five of it, though).
Sorscha stands up, feats, and moves to the right a little, to support that Destroyer. The left Destroyer stands up and prepares to wale on Twitch - but not killing him!! Three focus, and I left Twitch on two boxes. *shakes head*
Cryx should have scored another point, but we spaced it.
Cryx - Turn 3
She knows she's got me on the ropes, so upkeeps Crippling Grasp, and shakes Stationary on herself and her 'jacks (sitting on 1 focus), and runs through the forest to the left side flag (away from all my stuff), basing the flag. Clank then charges the Destroyer, scratching his paint, and Twitch does some more scratching.
Spew limps forward and blocks out the right-hand Destroyer. Cryx scores two points.
Khador - Turn 4
Only one chance to win - assassination. Destroyer backs up, taking two free strikes. Twitch does nothing (both his arms are crippled) but Clank hits. Sadly, he does the perfect amount of damage to disable the Destroyer's gun :( So boosting to hit only gives me two dice, and I miss. Scatter comes back and to the side forever and a day, so nothing. Sorscha Wind Rushes (getting close in melee range of Twitch), casts Boundless Charge (because Crippling Grasp stole 2" SPD), and charges Deneghra (Twitch missed the free strike on one die). Both Sorscha and Deneghra are now bssing the flag. I need to boost to hit, though (Crippling Grasp again) and ... miss. Buy an attack and pray ... and hit! Wahoo - but I only do five damage, which Deneghra voids with her last focus. :(
No picture this turn...
Cryx - Turn 4
She just smiles, and wins on scenario 1-6. Actually, she won the previous round 0-5, but oh well.
Time for a rematch, again, but I've really got to find a way to defeat Deneghra or my wife is going to roll all over me. Honestly, I don't even have any real take-aways except fighting Deneghra sucks...
Same lists as the first game:
Sorscha
- Destroyer
- Destroyer
Deneghra
- Twitch (Slayer)
- Spew (Defile)
- Gimpy (Deathripper)
- Clank (Deathripper)
The rolloff for first turn was won by me, and I elected to go first.
Khador - Turn 1
In retrospect, I probably should have went second. :/ The Destroyers move on, along with Sorscha. Focus is allocated, but not used. Everybody simply walks forward. Mainly because I am trying to stay as far from Deneghra as possible, until I'm ready to put the smackdown on. Sorscha does cast Wind Rush for +2 DEF.
Cryx - Turn 1
Cryx moves on the board on the left side, moving halfway up the board thanks to how fast they are. Holy crap! Moving 7" on and then running 14" is really huge when the board is only 30" wide. Gimpy runs into the center woods, with Spew moving in behind him (but out of the woods). Clank ran up the left side, approaching the flag. Twitch advanced to 10" away from my Destroyer. Deneghra walked up, and arced a couple boosted Venoms onto Sorscha and the Destroyer, for no real damage.
No picture of this turn.
Khador - Turn 2
So, I kept out of Deneghra's feat range, which was nice, and now lets kill some 'jacks. First, I made a big mistake here. I forgot about Boundless Charge. I knew that Twitch was 10" away, and assumed I wouldn't be able to get to him because I was only SPD 4. However, Boundless Charge gives +2" of movement on the charge, so I could have gotten to him. Then a couple of whacks with my axe and I could have easily dropped the heavy.
Instead, Sorscha hit Gimpy with a boosted Freezing Grip, making the little guy Stationary (and DEF5). The Destroyers then sat still and aimed at him, wanting to remove the arc node. The two shots left Gimpy on only 3 boxes, with cortex and movement out. Not exactly the result I was looking for.
Cryx - Turn 2
This is where my wife completely surprised me. Rather than advancing or charging everything into my 'jacks, she repositioned. Clank moved into base with the flag on the left. Gimpy moved out of the woods to the right, and Spew ran to base the flag on the right. Deneghra moved around the woods, used her Feat, and cast Scourge onto the Destroyer next to Sorscha, knocking them both down. She then hits Sorscha with Crippling Grasp.
Twitch then charged into the Destroyer and tried to whack him. It didn't go well. :)
No picture of this turn, again.
Score 0-2
Advantage Cryx
Advantage Cryx
Khador - Turn 3
Hmm, that's not good. I didn't expect her to go for scenario. I need to contest the right flag, or she's going to win by moving Deneghra into base contact (and losing on scenario in a Rumble would be embarrassing). So the right hand Destroyer moves up 2" (his new speed *sigh*) to be (just barely) within 4" and shoots into the cluster of 'jacks and Deneghra. He kills Gimpy, knocks out the head and cortex of Spew, and puts a couple damage boxes onto Deneghra (she ignores five of it, though).
Sorscha stands up, feats, and moves to the right a little, to support that Destroyer. The left Destroyer stands up and prepares to wale on Twitch - but not killing him!! Three focus, and I left Twitch on two boxes. *shakes head*
Cryx should have scored another point, but we spaced it.
Cryx - Turn 3
She knows she's got me on the ropes, so upkeeps Crippling Grasp, and shakes Stationary on herself and her 'jacks (sitting on 1 focus), and runs through the forest to the left side flag (away from all my stuff), basing the flag. Clank then charges the Destroyer, scratching his paint, and Twitch does some more scratching.
Spew limps forward and blocks out the right-hand Destroyer. Cryx scores two points.
Khador - Turn 4
Only one chance to win - assassination. Destroyer backs up, taking two free strikes. Twitch does nothing (both his arms are crippled) but Clank hits. Sadly, he does the perfect amount of damage to disable the Destroyer's gun :( So boosting to hit only gives me two dice, and I miss. Scatter comes back and to the side forever and a day, so nothing. Sorscha Wind Rushes (getting close in melee range of Twitch), casts Boundless Charge (because Crippling Grasp stole 2" SPD), and charges Deneghra (Twitch missed the free strike on one die). Both Sorscha and Deneghra are now bssing the flag. I need to boost to hit, though (Crippling Grasp again) and ... miss. Buy an attack and pray ... and hit! Wahoo - but I only do five damage, which Deneghra voids with her last focus. :(
No picture this turn...
Score 1-4
Advantage Cryx
Advantage Cryx
Cryx - Turn 4
She just smiles, and wins on scenario 1-6. Actually, she won the previous round 0-5, but oh well.
Time for a rematch, again, but I've really got to find a way to defeat Deneghra or my wife is going to roll all over me. Honestly, I don't even have any real take-aways except fighting Deneghra sucks...
Saturday, April 8, 2017
Battle Report #5: Khador (Sorscha) vs Cryx (Deneghra)
As stated earlier, I'm starting a slow-grow, teaching "league" with my wife, Melissa. We have both of our battle boxes painted, and were finally able to get some games in last week.
Both of our battle boxes were chosen based on multiple criteria, but the main was that I already owned the battle boxes. After that, Melissa wanted the opportunity to build her own battle box, and paint her army. Since Khador is my second army (after Minions), I finished building and magnetizing the Khador battle box (by the way, in case you missed the earlier posts, these are Mk II battle boxes) to match against Melissa's Cryx. However, there was too large of a discrepancy in points for the standard battle group, so it was changed slightly.
My army:
Kommander Sorscha [+29]
- Destroyer [14]
- Destroyer [14]
Melissa's army:
War Witch Deneghra [+28]
- Clank - Deathripper [6]
- Gimpy - Deathripper [6]
- Spew - Defiler [8]
- Twitch - Slayer [10]
A quick addition shows Khador is at -1, and Cryx is at +2. :) But, I'm not worried - I'm an experienced Warmachine player and Melissa is just a beginner. ;)
First, since we were playing such small games, we were using the Rumble rules. For those who have never played, the rules for a Rumble game are as follows:
- The board is 30x30
- Armies are not deployed on the board at the beginning of the game.
- When deploying, models are moved onto the board their speed. Once all a player's models have been moved on, that player's first turn starts.
Our board was set up, with a simple two flag (control for 1 CP, dominate for 2 CP) scenario, though it would be highly unlikely that the scenario would come into play. Also, we were playing a fairly simple ruleset (no Advanced Rules or anything funky), giving my wife an opportunity to get her feet wet without lots of things to remember.
Khador - Turn One:
Cryx won the roll-off, and she decided to go second. So, Khador moved onto the board centrally, and then ran both 'jacks towards the flags (trying to get into good firing locations). Sorscha cast Wind Rush, and then advanced into the woods. With no targets, that was my turn.
Cryx - Turn One:
First, let me say Cryx are fast. Really fast! That was really a surprise for me. After Melissa moved her army onto the field 7" (everything but the Slayer anyway), we discussed strategy and possible avenues of attack. One of the things that drew this faction to my wife was that it was made up of very fast, hard hitting, but fragile, components. She really digs the glass cannon concept.
So, after discussing possible first turns, she selects her favorite scenario and starts. First, she moves Clank to the edge of the hill, 8" from Sorscha. Next, she moves Gimpy up in front of Deneghra to provide some protection. Deneghra then moves up and Feats. She then attempts to arc a boosted Parasite into Sorscha (from Clank) but misses. However, her feat catches my whole army (all three models), which really hurts. Spew advances and attempts to spray Sorscha, catching the Destroyer as well. She doesn't roll well, missing the boosted shot into Sorscha, but it does catch the Destroyer (no damage, but it is now Corroded). Then, Twitch charges Sorscha. The monster misses his charge attack, but does get two hits on her, so Sorscha uses focus to blunt them slightly and is sitting on about half health.
Khador - Turn Two:
Hmm, that's a little not nice. -2 to every stat, no charges, runs, or slams makes this turn difficult. And I thought SPD 4 warjacks were slow - try SPD 2! And then I see that Sorscha's feat requires LOS (I didn't know that before). So rather than Feating and then moving, she has to move first to catch Deneghra.
Realizing this, Sorscha advances around Twitch, engaging Spew as well, and Feats. This catches the board, making all enemies stationary. She then proceeds to ... roll really horribly, unable to even scratch the Slayer on three of her seven attacks. When she finishes, Twitch is still on several boxes, with only its movement out (which didn't help me much, as it was still stationary).
So, after some measuring and weighing my options, I sent the Destroyer into Twitch (Twitch was barely under 3" away). He killed it in one swing (Melissa had to leave him lying there for one round :) ). The other Destroyer moved up slightly and dropped a shot onto Gimpy, in front of Deneghra. One thing noted AFTER our games were played was that Deneghra has Stealth - she didn't need the protection of Gimpy, and it actually made her more vulnerable. Gimpy loses everything but Cortex, and Deneghra loses a few boxes.
Cryx - Turn Two:
I didn't cast Wind Rush the previous turn (I needed all the focus to smack Twitch) - big mistake! After talking some more about the strategy, Melissa shook stationary from Clank and Deneghra. Deneghra then activated and sent a boosted Scourge into Sorscha. She wasn't in the forest (not completely in, my mistake!) and was no longer engaged/engaging Spew (he was stationary, so can't be engaged) so she was only DEF 16! Serious mistakes on my part, I was expecting her to be DEF 20+. Scourge hit, did a couple damage, but more importantly knocked her down.
Clank walks forward, autohits because she's knocked down, does damage, buys an attack (from the Power Up focus) and kills Sorscha.
Cryx Victory!!
Well, that was a little ... surprising. Yes, my wife had help discussing strategy - which actually helped me as well. As the game progressed and we talked about various moves, I saw my mistakes. Hopefully, this will help me alleviate them in the future (and help her become a better player, too)!
Lessons learned:
- Deneghra is brutal in small games. Yes, she's good regardless, but in the close quarters of Rumble and the few models to mitigate her Feat, she is crazy, nasty effective.
- Khador is a new army for me in Mk III - quit assuming I know how everything works because I played them in Mk II (a little). Read the cards, pay attention to detail, and stop with the tunnel vision!
- Protect your warcaster! I kept pointing this out to Melissa, wanting her to understand this important concept, and then completely ignored it for myself. DUMB!
Thanks for reading!
Both of our battle boxes were chosen based on multiple criteria, but the main was that I already owned the battle boxes. After that, Melissa wanted the opportunity to build her own battle box, and paint her army. Since Khador is my second army (after Minions), I finished building and magnetizing the Khador battle box (by the way, in case you missed the earlier posts, these are Mk II battle boxes) to match against Melissa's Cryx. However, there was too large of a discrepancy in points for the standard battle group, so it was changed slightly.
My army:
Kommander Sorscha [+29]
- Destroyer [14]
- Destroyer [14]
Melissa's army:
War Witch Deneghra [+28]
- Clank - Deathripper [6]
- Gimpy - Deathripper [6]
- Spew - Defiler [8]
- Twitch - Slayer [10]
A quick addition shows Khador is at -1, and Cryx is at +2. :) But, I'm not worried - I'm an experienced Warmachine player and Melissa is just a beginner. ;)
First, since we were playing such small games, we were using the Rumble rules. For those who have never played, the rules for a Rumble game are as follows:
- The board is 30x30
- Armies are not deployed on the board at the beginning of the game.
- When deploying, models are moved onto the board their speed. Once all a player's models have been moved on, that player's first turn starts.
Our board was set up, with a simple two flag (control for 1 CP, dominate for 2 CP) scenario, though it would be highly unlikely that the scenario would come into play. Also, we were playing a fairly simple ruleset (no Advanced Rules or anything funky), giving my wife an opportunity to get her feet wet without lots of things to remember.
Khador - Turn One:
Cryx won the roll-off, and she decided to go second. So, Khador moved onto the board centrally, and then ran both 'jacks towards the flags (trying to get into good firing locations). Sorscha cast Wind Rush, and then advanced into the woods. With no targets, that was my turn.
Cryx - Turn One:
First, let me say Cryx are fast. Really fast! That was really a surprise for me. After Melissa moved her army onto the field 7" (everything but the Slayer anyway), we discussed strategy and possible avenues of attack. One of the things that drew this faction to my wife was that it was made up of very fast, hard hitting, but fragile, components. She really digs the glass cannon concept.
So, after discussing possible first turns, she selects her favorite scenario and starts. First, she moves Clank to the edge of the hill, 8" from Sorscha. Next, she moves Gimpy up in front of Deneghra to provide some protection. Deneghra then moves up and Feats. She then attempts to arc a boosted Parasite into Sorscha (from Clank) but misses. However, her feat catches my whole army (all three models), which really hurts. Spew advances and attempts to spray Sorscha, catching the Destroyer as well. She doesn't roll well, missing the boosted shot into Sorscha, but it does catch the Destroyer (no damage, but it is now Corroded). Then, Twitch charges Sorscha. The monster misses his charge attack, but does get two hits on her, so Sorscha uses focus to blunt them slightly and is sitting on about half health.
Khador - Turn Two:
Hmm, that's a little not nice. -2 to every stat, no charges, runs, or slams makes this turn difficult. And I thought SPD 4 warjacks were slow - try SPD 2! And then I see that Sorscha's feat requires LOS (I didn't know that before). So rather than Feating and then moving, she has to move first to catch Deneghra.
Realizing this, Sorscha advances around Twitch, engaging Spew as well, and Feats. This catches the board, making all enemies stationary. She then proceeds to ... roll really horribly, unable to even scratch the Slayer on three of her seven attacks. When she finishes, Twitch is still on several boxes, with only its movement out (which didn't help me much, as it was still stationary).
So, after some measuring and weighing my options, I sent the Destroyer into Twitch (Twitch was barely under 3" away). He killed it in one swing (Melissa had to leave him lying there for one round :) ). The other Destroyer moved up slightly and dropped a shot onto Gimpy, in front of Deneghra. One thing noted AFTER our games were played was that Deneghra has Stealth - she didn't need the protection of Gimpy, and it actually made her more vulnerable. Gimpy loses everything but Cortex, and Deneghra loses a few boxes.
Cryx - Turn Two:
I didn't cast Wind Rush the previous turn (I needed all the focus to smack Twitch) - big mistake! After talking some more about the strategy, Melissa shook stationary from Clank and Deneghra. Deneghra then activated and sent a boosted Scourge into Sorscha. She wasn't in the forest (not completely in, my mistake!) and was no longer engaged/engaging Spew (he was stationary, so can't be engaged) so she was only DEF 16! Serious mistakes on my part, I was expecting her to be DEF 20+. Scourge hit, did a couple damage, but more importantly knocked her down.
Clank walks forward, autohits because she's knocked down, does damage, buys an attack (from the Power Up focus) and kills Sorscha.
Cryx Victory!!
Well, that was a little ... surprising. Yes, my wife had help discussing strategy - which actually helped me as well. As the game progressed and we talked about various moves, I saw my mistakes. Hopefully, this will help me alleviate them in the future (and help her become a better player, too)!
Lessons learned:
- Deneghra is brutal in small games. Yes, she's good regardless, but in the close quarters of Rumble and the few models to mitigate her Feat, she is crazy, nasty effective.
- Khador is a new army for me in Mk III - quit assuming I know how everything works because I played them in Mk II (a little). Read the cards, pay attention to detail, and stop with the tunnel vision!
- Protect your warcaster! I kept pointing this out to Melissa, wanting her to understand this important concept, and then completely ignored it for myself. DUMB!
Thanks for reading!
Thursday, April 6, 2017
Battle Report #4: Trollbloods (Jarl) vs. Retribution (Vyros2)
Since the beginning of January, the local guys and I have been playing in a league with the guys from Spokane (to the North) and Tri-Cities/Wenatchee (to the West). Last week was a break in the league, and my opponent and I both took the opportunity to play games with armies outside of our factions. :)
For me, that meant I was able to put my gunslinging Trollbloods on the table! Wahoo! This list is built around the totally awesome looking Trollkin Highwaymen and Braylen Wanderheart. It runs Jarl Skuld as its Warlock, but that is for two reasons: #1 - he came with the models in a group I purchased and #2 - he's an outlaw! :)
My list consists of:
Jarl Skuld, Devil of the Thornwood [+30]
- Dire Troll Mauler [15]
- Troll Impaler [11]
- Troll Bouncer [9]
Braylen Wanderheart, Trollkin Outlaw [5]
Trollkin Highwaymen [15]
Pyg Bushwhackers [15]
- Pyg Bushwhacker Officer/Mortar[5]
I've received a lot of advice not to run Jarl, which I can understand. But I want to give him a fair trial before (or if) I decide to remove him, because I do believe he has some upside.
- He gets two RNG 16 (with Far Strike) POW 12 shots - combined with his movement he threats 22". He also has multiple ways of then retreating. This makes him a very capable hit-and-run style assassination threat. Move up, pop the caster with two boosted POW 12's, move away. Rinse and repeat.
- His feat actually has interesting applications. Worried about that gunline? Put up a cloud wall and move in behind it. Worried about charges and threat ranges? Put up a cloud wall. The best part is that YOU can still draw line-of-sight through it, so your shooting is not hampered in the least. Nor charges, if you need to get those Maulers into combat.
The list is definitely a ranged attack army (obviously). However, it is short-ranged, so I have a lot of the issues with delivering melee infantry. The one thing this list could really use is Snipe (not Far Strike). Being able to make those RNG8 pistols RNG12 would be awesome!
My opponent was playing his Retribution, and his list was led by Vyros2.
Vyros, Incissar of the Dawnguard [+27]
- Sylys Wyshnalyrr, The Seeker [4]
- Aspis [6]
- Phoenix [18]
- Imperatus [22]
- Sphinx [13]
Arcanist Mechanik [2]
Dawnguard Sentinel Scyir [4]
Dawnguard Sentinels [18]
- Dawnguard Sentinel Officer/Standard [4]
Stormfall Archers [9]
The scenario we were playing was Recon, with a very forest setting. Basically, Jarl decided to attack a Retribution supply train, and may have bitten off more than he could chew. :D
Trolls won the rolloff, and decided to go second. Mainly because I wanted to deploy in response to the Retribution (I mean, c'mon - I was ambushing them!) and partly because I didn't want the water on my side.
Retribution Deployment
He deployed his battlegroup mostly center, with the Phoenix all the way on the right flank. Stormfall Archers went next to the myrmidons and the Sentinels filled the large gap between the Phoenix and the rest of the battle group.
Trollbloods Deployment
It's pretty bad when you don't even follow your own plan at the beginning of the game.
Trollbloods deploy one unit of Highwaymen behind a forest, and one unit on the left flank in a forest, with Braylen. These were my flanking unit, and were meant to be self-sufficient. Their main job was to get behind the main battle force and get Back Strike bonuses.
The Maulers deployed next to the Highwaymen behind the forest (mistake #1) with the two light warbeasts and Jarl on the other side of the Highwaymen (mistake #2). Don't ask why, because I honestly couldn't tell you what I was thinking. It was just bad deployment.
The Pygs Advance Deployed in front of the main army.
In retrospect, looking at it, I think that the reason I was so skewed was because I was sitting skewed. These tables are normally 40k tables, and I was sitting centrally for a 96" table (there's space on the edge to place armies/bags). No excuse really, but possible.
Retribution - Turn One:
Vyros casts Easy Rider (giving his whole army Pathfinder) and Synergy, then advances. Everything else runs, with the Archers moving in behind the hedge, the myrmidons forming up around Vyros, and the Phoenix pushing up the right flank. The Sentinels also advanced, moving into the forest and trying to keep (at least some) out of sight. The Arcanists follow the myrmidons and the Scyir follows his battle brothers.
Trollbloods - Turn One:
Well, that was expected, lets see what I can get out of this. First, the Highwaymen on the left advance up, spreading out. But for some reason, I was scared of the Stormfalls. This caused me to be timid and only a few were going to be in range to do anything next turn (mistake #3). Braylen moved up behind the hedge, getting Stealth (since it gave her concealment).
Jarl advances, casts Weald Secrets on the Pygs and Tactical Supremacy on the Highwaymen close by.
Pygs advance and begin shooting CRA's into the Sentinels. Well, first the Mortar fires. A little side story - a friend of mine plays Trolls a lot (I actually wanted to play the Highwaymen because of seeing his) and has horrible results from the Mortar. It's basically a complete throw-away model for him. So I wasn't expecting anything from the little bugger when it fired at the Phoenix. Range was short by an inch, so automatic scatter - which resulted in 5" towards the Phoenix! Behind the myrmidon was a small cluster of four Sentinels. The lowly mortar blew three of them up! The CRA's then joined in, removing Sentinels left and right - it was so awesome! When the shooting finished, six Sentinels were dead!
Remember mistakes #1 and #2 from above? Now they bite me - one of the Maulers was not in Jarl's control range, and the second (front) one was just barely. So, the front one runs up along the forest edge, while the second Mauler advances behind, riling for one (mistake #4 - I should have just moved them to Jarl). The Impaler moves up, casts Far Strike, and takes a potshot at the Phoenix, knocking some boxes off his shield. The Highwaymen advance, spreading out a little, and the Bouncer runs up as well.
Retribution - Turn Two:
The Sentinels use their Vengeance move to move to the edge of the forest (they weren't able to get out of the forest because Easy Rider had expired) and Sylys upkeeps Synergy for free.
The Stormfall Archers shoot at the Highwaymen, using Snipe (three times) and Brutal (once) to kill five of them! Left them clumped too close together, I guess (part of mistake #3 above).
The Phoenix advanced out of the forest and put a Halo Cannon shot into the middle of the Pygs, hitting seven (including the leader and the mortar). The mortar Toughs, as well as three of the Pygs (including a newly promoted leader). The Sentinels advance and use their mini-feat to (hopefully) weather any shooting the Trollbloods are going to send at them.
Everything else advances into the zone, getting ready for a scrum.
Trollbloods - Turn Two:
Jarl lets Weald Secrets drop and upkeeps Tactical Supremacy.
The Highwaymen on the left, now realizing their extremely poor positioning, review their options. They can move, and allow one of them to shoot, and the rest surround the flag. Or, they can run and engage the Stormfall Archers. I chose to take the potshot and grab the points for the flag.
Pygs move up around the flag, with three of them standing up and forfeiting their Combat action (mistake #5 - I need to remember that command is not the same as unit coherency in 40k). The ones that can shoot do so into the Sentinels, killing two. The Highwaymen move up as well, CRAing into the Sentinels and killing three more. They then Reposition 3" to spread out and provide a speed bump to any incoming attacks.
Maulers move, putting themselves into position to countercharge anything that stomps the Highwaymen.
Bouncer moves up to take any more Phoenix shots targeting the Pygs (because they've been doing good work this game) and the Impaler moves around and tries to drop the last Sentinel, but is unable.
Jarl moves closer to the forest (and his Maulers) - finally realizing that his heavies are not going to be much good if they can't stay in his control range. He then measures it out - 12" to that Phoenix, I can hit him with a Magic Bullet and drop the last Sentinel (I don't know why I was so fixated on killing him). Just in case, though, I cast Quicken (mistake #6 - I missed that it was +2 DEF only against ranged/magic attacks). Then Magic Bullet, then spent one for Far Strike (mistake #7 - confused the Highwaymen's guns with Jarl's - he's already RNG 12, didn't need Far Strike) and shot at the Phoenix. And missed :( BUGGER! Oh well, not worried. Jarl Feats, putting 5 clouds on the table (three between him and the Phoenix) (mistake #8 - see below).
Retribution - Turn 3:
Sylys upkeeps Synergy for free and the remaining Sentinel walks in with Vengeance and whacks a Highwayman.
I think Vyros Feated here, but not sure. It didn't matter. Remember mistake #8 above? Yeah, I forgot (actually, I didn't even know) that Vyros has Bird's Eye. This nifty ability lets models in his battle group ignore clouds, forests, and intervening models when determining LOS. So basically, it completely negates Jarl's Feat - a simple ability! :( GRRR! Who the heck thought that up?!?
Anyway, Vyros charges into the Highwaymen, killing multiple thanks to his melee attacks and Quick Work. The final Sentinel also moves up and kills one (the last one between the Phoenix and Jarl). My opponent measures, decides he has range, and charges the Phoenix through the clouds and barely into Jarl (mistake #9). First swing (boosted) hits (this is when I realize mistake #6) and does good damage. He buys an attack, hits, and finishes off Jarl. :(
RESULT: Retribution victory
So after the game, Jarl is given to many moments of reflection and is able to see his mistakes, and how they cost him the game:
1) Understand your battle plan, and deploy accordingly. Two mistakes in deployment left me hampered through much of the game.
2) Understand YOUR ARMY! Yes, it was a new army with a new 'caster, but I made multiple mistakes, including one that cost me the game, because I did not read/understand/remember my cards.
3) Understand your opponent. This is harder for me, I can't remember everything, but I should have at least looked at his cards, to understand what was coming. It would have saved me from some nasty surprised.
4) It's OK to ask him to verify his measurements. I was pretty sure Jarl was 12" away, and I should have asked him to double check. Better still, I should have been more clear with my measurements as I was making them, so he could double check me to verify Jarl was 12" away.
Thanks for reading!
For me, that meant I was able to put my gunslinging Trollbloods on the table! Wahoo! This list is built around the totally awesome looking Trollkin Highwaymen and Braylen Wanderheart. It runs Jarl Skuld as its Warlock, but that is for two reasons: #1 - he came with the models in a group I purchased and #2 - he's an outlaw! :)
My list consists of:
Jarl Skuld, Devil of the Thornwood [+30]
- Dire Troll Mauler [15]
- Troll Impaler [11]
- Troll Bouncer [9]
Braylen Wanderheart, Trollkin Outlaw [5]
Trollkin Highwaymen [15]
Pyg Bushwhackers [15]
- Pyg Bushwhacker Officer/Mortar[5]
I've received a lot of advice not to run Jarl, which I can understand. But I want to give him a fair trial before (or if) I decide to remove him, because I do believe he has some upside.
- He gets two RNG 16 (with Far Strike) POW 12 shots - combined with his movement he threats 22". He also has multiple ways of then retreating. This makes him a very capable hit-and-run style assassination threat. Move up, pop the caster with two boosted POW 12's, move away. Rinse and repeat.
- His feat actually has interesting applications. Worried about that gunline? Put up a cloud wall and move in behind it. Worried about charges and threat ranges? Put up a cloud wall. The best part is that YOU can still draw line-of-sight through it, so your shooting is not hampered in the least. Nor charges, if you need to get those Maulers into combat.
The list is definitely a ranged attack army (obviously). However, it is short-ranged, so I have a lot of the issues with delivering melee infantry. The one thing this list could really use is Snipe (not Far Strike). Being able to make those RNG8 pistols RNG12 would be awesome!
My opponent was playing his Retribution, and his list was led by Vyros2.
Vyros, Incissar of the Dawnguard [+27]
- Sylys Wyshnalyrr, The Seeker [4]
- Aspis [6]
- Phoenix [18]
- Imperatus [22]
- Sphinx [13]
Arcanist Mechanik [2]
Dawnguard Sentinel Scyir [4]
Dawnguard Sentinels [18]
- Dawnguard Sentinel Officer/Standard [4]
Stormfall Archers [9]
The scenario we were playing was Recon, with a very forest setting. Basically, Jarl decided to attack a Retribution supply train, and may have bitten off more than he could chew. :D
Trolls won the rolloff, and decided to go second. Mainly because I wanted to deploy in response to the Retribution (I mean, c'mon - I was ambushing them!) and partly because I didn't want the water on my side.
Retribution Deployment
He deployed his battlegroup mostly center, with the Phoenix all the way on the right flank. Stormfall Archers went next to the myrmidons and the Sentinels filled the large gap between the Phoenix and the rest of the battle group.
Trollbloods Deployment
It's pretty bad when you don't even follow your own plan at the beginning of the game.
Trollbloods deploy one unit of Highwaymen behind a forest, and one unit on the left flank in a forest, with Braylen. These were my flanking unit, and were meant to be self-sufficient. Their main job was to get behind the main battle force and get Back Strike bonuses.
The Maulers deployed next to the Highwaymen behind the forest (mistake #1) with the two light warbeasts and Jarl on the other side of the Highwaymen (mistake #2). Don't ask why, because I honestly couldn't tell you what I was thinking. It was just bad deployment.
The Pygs Advance Deployed in front of the main army.
In retrospect, looking at it, I think that the reason I was so skewed was because I was sitting skewed. These tables are normally 40k tables, and I was sitting centrally for a 96" table (there's space on the edge to place armies/bags). No excuse really, but possible.
Retribution - Turn One:
Vyros casts Easy Rider (giving his whole army Pathfinder) and Synergy, then advances. Everything else runs, with the Archers moving in behind the hedge, the myrmidons forming up around Vyros, and the Phoenix pushing up the right flank. The Sentinels also advanced, moving into the forest and trying to keep (at least some) out of sight. The Arcanists follow the myrmidons and the Scyir follows his battle brothers.
Trollbloods - Turn One:
Well, that was expected, lets see what I can get out of this. First, the Highwaymen on the left advance up, spreading out. But for some reason, I was scared of the Stormfalls. This caused me to be timid and only a few were going to be in range to do anything next turn (mistake #3). Braylen moved up behind the hedge, getting Stealth (since it gave her concealment).
Jarl advances, casts Weald Secrets on the Pygs and Tactical Supremacy on the Highwaymen close by.
Pygs advance and begin shooting CRA's into the Sentinels. Well, first the Mortar fires. A little side story - a friend of mine plays Trolls a lot (I actually wanted to play the Highwaymen because of seeing his) and has horrible results from the Mortar. It's basically a complete throw-away model for him. So I wasn't expecting anything from the little bugger when it fired at the Phoenix. Range was short by an inch, so automatic scatter - which resulted in 5" towards the Phoenix! Behind the myrmidon was a small cluster of four Sentinels. The lowly mortar blew three of them up! The CRA's then joined in, removing Sentinels left and right - it was so awesome! When the shooting finished, six Sentinels were dead!
Remember mistakes #1 and #2 from above? Now they bite me - one of the Maulers was not in Jarl's control range, and the second (front) one was just barely. So, the front one runs up along the forest edge, while the second Mauler advances behind, riling for one (mistake #4 - I should have just moved them to Jarl). The Impaler moves up, casts Far Strike, and takes a potshot at the Phoenix, knocking some boxes off his shield. The Highwaymen advance, spreading out a little, and the Bouncer runs up as well.
Retribution - Turn Two:
The Sentinels use their Vengeance move to move to the edge of the forest (they weren't able to get out of the forest because Easy Rider had expired) and Sylys upkeeps Synergy for free.
The Stormfall Archers shoot at the Highwaymen, using Snipe (three times) and Brutal (once) to kill five of them! Left them clumped too close together, I guess (part of mistake #3 above).
The Phoenix advanced out of the forest and put a Halo Cannon shot into the middle of the Pygs, hitting seven (including the leader and the mortar). The mortar Toughs, as well as three of the Pygs (including a newly promoted leader). The Sentinels advance and use their mini-feat to (hopefully) weather any shooting the Trollbloods are going to send at them.
Everything else advances into the zone, getting ready for a scrum.
Trollbloods - Turn Two:
Jarl lets Weald Secrets drop and upkeeps Tactical Supremacy.
The Highwaymen on the left, now realizing their extremely poor positioning, review their options. They can move, and allow one of them to shoot, and the rest surround the flag. Or, they can run and engage the Stormfall Archers. I chose to take the potshot and grab the points for the flag.
Pygs move up around the flag, with three of them standing up and forfeiting their Combat action (mistake #5 - I need to remember that command is not the same as unit coherency in 40k). The ones that can shoot do so into the Sentinels, killing two. The Highwaymen move up as well, CRAing into the Sentinels and killing three more. They then Reposition 3" to spread out and provide a speed bump to any incoming attacks.
Maulers move, putting themselves into position to countercharge anything that stomps the Highwaymen.
Bouncer moves up to take any more Phoenix shots targeting the Pygs (because they've been doing good work this game) and the Impaler moves around and tries to drop the last Sentinel, but is unable.
Jarl moves closer to the forest (and his Maulers) - finally realizing that his heavies are not going to be much good if they can't stay in his control range. He then measures it out - 12" to that Phoenix, I can hit him with a Magic Bullet and drop the last Sentinel (I don't know why I was so fixated on killing him). Just in case, though, I cast Quicken (mistake #6 - I missed that it was +2 DEF only against ranged/magic attacks). Then Magic Bullet, then spent one for Far Strike (mistake #7 - confused the Highwaymen's guns with Jarl's - he's already RNG 12, didn't need Far Strike) and shot at the Phoenix. And missed :( BUGGER! Oh well, not worried. Jarl Feats, putting 5 clouds on the table (three between him and the Phoenix) (mistake #8 - see below).
Retribution - Turn 3:
Sylys upkeeps Synergy for free and the remaining Sentinel walks in with Vengeance and whacks a Highwayman.
I think Vyros Feated here, but not sure. It didn't matter. Remember mistake #8 above? Yeah, I forgot (actually, I didn't even know) that Vyros has Bird's Eye. This nifty ability lets models in his battle group ignore clouds, forests, and intervening models when determining LOS. So basically, it completely negates Jarl's Feat - a simple ability! :( GRRR! Who the heck thought that up?!?
Anyway, Vyros charges into the Highwaymen, killing multiple thanks to his melee attacks and Quick Work. The final Sentinel also moves up and kills one (the last one between the Phoenix and Jarl). My opponent measures, decides he has range, and charges the Phoenix through the clouds and barely into Jarl (mistake #9). First swing (boosted) hits (this is when I realize mistake #6) and does good damage. He buys an attack, hits, and finishes off Jarl. :(
RESULT: Retribution victory
So after the game, Jarl is given to many moments of reflection and is able to see his mistakes, and how they cost him the game:
1) Understand your battle plan, and deploy accordingly. Two mistakes in deployment left me hampered through much of the game.
2) Understand YOUR ARMY! Yes, it was a new army with a new 'caster, but I made multiple mistakes, including one that cost me the game, because I did not read/understand/remember my cards.
3) Understand your opponent. This is harder for me, I can't remember everything, but I should have at least looked at his cards, to understand what was coming. It would have saved me from some nasty surprised.
4) It's OK to ask him to verify his measurements. I was pretty sure Jarl was 12" away, and I should have asked him to double check. Better still, I should have been more clear with my measurements as I was making them, so he could double check me to verify Jarl was 12" away.
Thanks for reading!
Friday, March 31, 2017
Battle Report #3 - Minions (Maelok) vs. Khador (Irusk2)
So, this game was played last Saturday - sorry for the slow report. It's been a rough week. Also, you will notice several "mistakes" - my opponent was playing Mk III for the first time (he was a fairly consistent Mk II player), as well as playing Khador for the first time (he was a Minions player in Mk II - I actually got about half of my Minions from him).
So I was really wanting to play my dojo'd Barnabas list, to see if my theories were correct. However, my opponent had either Butcher1 or Irusk2 available, and there's no way I was going to take the chance that he'd put Irusk2 down (I've already run into Solid Ground with Barnabas, and it's not fun). So, I swapped out the Barnabas list for Maelok (it's actually fairly similar) and sure enough, my opponent played Irusk2.
My list:
The Blindwater Congregation theme
Maelok the Dreadbound [+28]
- Blackhide Wrastler [16]
Gatorman Witch Doctor [0]
Wrong Eye [17]
- Snapjaw [0]
Gatorman Posse [17]
Gatorman Posse [17]
Gatorman Posse [17]
Swamp Gobber Bellows Crew [2]
It's pretty straightforward - Witch Docs keep Zombify on two Posse, until it's time to Sacrificial Strike one of them (probably after being Revived by Maelok). Maelok makes the other Undead with Death Pact. This limits souls harvested (which doesn't matter against Irusk) and gives a huge ARM swing during Maelok's Feat turn. I have three heavies for dealing with my opponent's armor, but realistically, if he's going warjack heavy, this list will have to rely on Gatormen Posse and Mortality to get work done.
My opponent's list:
Supreme Kommandant Irusk
- War Dog
- Kodiak
- Kodiak
- Destroyer
Man-o-War Drakhun
Man-o-War Kovnik
Widowmaker Marksman
Doom Reaver Swordsmen
- Greylord Escort
Man-o-War Shocktroopers
Widowmaker Scouts
We were playing the Incursion scenario with three obstructions (the two buildings and the large hill) and two forests. Two walls were placed on one table edge. I won the roll, and elected to go second, choosing the side without the walls.
My opponent's deployment, after Advance Deploy placements:
I deployed my three Posse at the edge of my deployment zone. The left side - red Posse (behind the large hill) - was supported by Wrong Eye, the right side - blue Posse (which I assumed was only going to have Widowmakers close) - had the Swamp Gobbers (which I placed REALLY poorly - they should have been in front) and the central - green Posse - had Maelok and his Wrastlers. This would allow me to put pressure on all three flags during my second turn.
Khador - Turn 1:
Irusk activates, casts Energizer, casts Fire For Effect on the Destroyer, and casts Solid Ground. Then advances behind the wall. Both Kodiaks run, filling the hole between the central building and the forest. Doom Reavers run, filling the hole between the two buildings. Drakhun runs up behind the Doom Reavers. Shocktroopers and Kovnik run. Destroyer runs up behind the central building. He forgot to move the Widowmakers and the Marksman, but I let him move them into the forest before I did anything.
Minions - Turn 1:
Well, dang - he's a lot further across the board than I thought he would be. After some measuring, and realizing I was going to get charged no matter what on the left side, I charged the red Posse into the Doom Reavers. Only one makes it (after praying for 2" extra), and he whacked a Doom Reaver. However, the homicidal maniac rolled his Tough check, getting knocked down (he was just out of Irusk's Solid Ground). The Gators' supporting Witch Doc moves up and Zombifies them. On the right flank, I realize my mistake after advancing the Posse - the Gobbers are not going to be able to advance and put down the cloud in front of them. So, they pray for concealment, and the Gobbers move up and put down a cloud anyway. The Witch Doc moves up in the middle of the Gators (don't ask why, total brain fart) and Zombifies them. In retrospect - I should have just run the Gators, but I was worried about the Kodiaks. The green Posse advances cautiously, looking to support either side in anticipation of getting charged. Snapjaw advances, and casts Submerge and riles for three. Wrong Eye moves up, casts Star Crossed and Submerge. Both Wrastlers run (though really I just needed the fury) and Maelok moves up behind them and puts Death Pact on the green Posse.
Khador - Turn 2:
So, the knocked down Doom Reaver rises (didn't see that coming) and the unit charges into the Posse. Thanks to Star Crossed and eight damage boxes, only one dies (though another had to Tough to stay). Irusk moves up behind the building (he had upkept Fire For Effect and Solid Ground), and casts Energizer, moving up next to the building and out of sight. The Destroyer walks around the building and takes a shot at the green Posse. The shot misses (thanks to Dirge of Mists), but scatters into s position to still kill one and wound another. The Widomakers plus Marksmen move to the edge of the forest and take shots at the blue Posse, after killing their supporting Witch Doc (why did I move that guy there?). A Kodiak charges the blue Posse as well, curb stomping the poor guy that he contacts. The second Kodiak charges the green Posse, killing another Gatorman. Drakhun and accompanying Man-o-Wars advance further, and he passes turn.
Minions - Turn 2:
Mistakes are made - that's the theme.
First, before I go into the mistakes made, a little background on me. I have a neurological condition that really affects my ability to concentrate and stay focused. This also affects my memory, and ranges anywhere from really annoying to completely disrupting. While not an excuse for the mistakes made, it does contribute. So if you're reading this (and you don't know me), realize two things - #1 I'm not a hard-core tournament player. Don't get me wrong, I like to win, but this is a social game for me (and it's important). It's one of the few opportunities I have to interact with friends, and I relish every chance I get. #2 I have a hard time remembering everything MY army can do (and frequently forget things many times) - there's no way I'm going to know what my opponent's army does.
So, the Doom Reavers having Rise was a little surprising, as was losing two Posse members from the middle. And the stupid positioning on the Witch Doc AND the Gobbers cost me. Oh well, hopefully I remember better next time. Time to get some work done.
The painted Wrastler charges the Kodiak and proceeds to pound on it. However, I forget to cast Rage (that's the whole reason I bring these guys!) first, so he leaves the Kodiak on a few boxes. Not good, I don't want that guy alive. So the blue Posse charges, praying for distance. I get to the Widowmakers and their Marksman with two of them, and the other two hit the Kodiak. This was unnecessary, one of them put the big guy down. This also ended up being a cheating moment (sorry) as I completely misread the command range on the Posse (I thought it was 8, not 7). Those two guys way out there on the Widowmakers are out of command. :( They kill one of the Widowmakers (I never did realize they were out of command) but whiff on the Marksman.
I'm really wanting to get into the back arcs of those Doom Reavers (and maybe even into the Destroyer) so Maelok moves up, Revives two Gatorman (one in the green Posse, one in the blue) and pops his Feat. The green Posse get ready to move past the Doom Reavers, clearing the way for the Wrastler to the second Kodiak and engaging the Drakhun and Destroyer, when my opponent informs me that Doom Reavers have magical weapons. Ah crap! Ok, change of plans - red Posse activates, moves up and starts whacking Doom Reavers. Half-way through my slaughterfest, my opponent remembers he has Solid Ground up, which means the Tough Doom Reavers aren't getting knocked down. I let him take back the auto-kills and the Posse doesn't do near as well as the first run-through. However, I forgot their prayers - all those misses that could have been hits if I had remembered! Needless to say, the red Posse didn't kill the Doom Reavers, so the green Posse comes in to help. One of the green Posse (the one Revived) engages the Destroyer - which triggers counter-charge on the Drakhun. He can't hurt it, but he can get closer.
The Doom Reavers still survive, so Wrong Eye moves up (this was a bad decision!!). He takes a whack, but the Doom Reaver Toughs. The second Wrastler charges the second Drakhun (I remember Rage this time), but leaves him on just a couple boxes. Snapjaw activates, charges the Kodiak, and puts it down.
Khador - Turn 3:
My opponent wanted to concede here, as he thought he had nothing left, but I talked him into playing it out. He had a lot more left than he realized.
Needing to get shots off, the Widowmakers move away from the Posse engaging them. Both get hit by the free strikes, but the standard Widowmaker makes his Tough roll. What happens here? He can't be knocked down, but he should have been. We played that he stopped moving as soon as he left the front arc of the Gatorman. The Marksman died a horrible, horrible death. The remaining Widowmakers shoot at the blue Posse, killing the Revived one and doing a damage point to the leader.
Irusk dropped Solid Ground, puts Battle Lust on the Man-o-Wars, and pops Feat. Doom Reavers activate, whacking some Posse - including poor Wrong Eye :( However, Wrong Eye Toughs his death roll, keeping him (and Snapjaw) on the table. The Greylord Escort charges the Gator engaging the Destroyer, whacking him (I mismanaged this, I thought I was in the back arc of the Escort) and he Toughs. The Drakhun turns around, rides up, and lays the smackdown onto Snapjaw. The Man-o-Wars activate and charge, doing horrendous damage to the Posse, and more damage onto Snapjaw.
Minions - Turn 3:
Hmm, SPD 2 across the board. That isn't good. The painted Wrastler activates and charges the Drakhun, unhorsing him. The blue Posse get the Press Forward order (run/charge) - two charge the dismounted Drakhun, two run to the flag. It takes both Posse on the Drakhun to kill him, but they get the job done. Snapjaw advances and munches on a Man-o-War and a Doom Reaver, healing Wrong Eye both times. The green Posse activates, whacking a Doom Reaver and the Greylord Escort (the knocked down one stands up and gets his retribution).
Wrong Eye stands up, and whacks at a Man-o-War, doing nothing. I didn't remember to load Snapjaw up on Fury the previous turn, so he only had one. He kept it for transfers. The Witch Doc charges the Man-o-War, killing him. Red Posse members move in to engage the Man-o-Wars, but whiff (I forget to pray again, dang it!). Gobbers run to base the flag, and the silver Wrastler moves 2" towards the Man-o-Wars. Maelok moves up, puts Death Pact on Wrong Eye, and I pass turn.
My opponent concedes again, and this time I don't try to talk him out of it. His army is fairly depleted and Irusk really isn't going to get an assassination (Maelok is sitting on two Fury). He's only got five models left, with a good chunk of my army looking down his throat. And he was clearly frustrated with how things turned out.
Minions victory!
Lessons learned:
- Remember the frickin' prayers!! Gatorman Posse are very versatile, and can do amazing things - but only when you remember their abilities! I think I forgot Snacking half the time, as well. Very frustrating on my part. Also, they are only Command 7 - not 8 like I was playing the whole game.
- I think one of the best features of the new theme list is the +2" deployment. Don't get me wrong, I love 8-box Posse, but being 2" further up the field is really good, too!
- I really like running Wrong Eye. Several times Star Crossed saved Posse members and Snapjaw did good work as well. It would probably be a good idea to drop a Posse in the Barnabas list and add him there as well, but I want to try it with four Posse first.
- Irusk2's Tactician only affects Command range, not Control range - this is much different than we were playing it. Same with Total Obedience. And while his command is 10", that's a lot less than 14" and would have changed several outcomes. But as I said, I have a hard time remembering what my army can do, I depend on my opponent to understand theirs.
Thanks for reading!
So I was really wanting to play my dojo'd Barnabas list, to see if my theories were correct. However, my opponent had either Butcher1 or Irusk2 available, and there's no way I was going to take the chance that he'd put Irusk2 down (I've already run into Solid Ground with Barnabas, and it's not fun). So, I swapped out the Barnabas list for Maelok (it's actually fairly similar) and sure enough, my opponent played Irusk2.
My list:
The Blindwater Congregation theme
Maelok the Dreadbound [+28]
- Blackhide Wrastler [16]
Gatorman Witch Doctor [0]
Wrong Eye [17]
- Snapjaw [0]
Gatorman Posse [17]
Gatorman Posse [17]
Gatorman Posse [17]
Swamp Gobber Bellows Crew [2]
It's pretty straightforward - Witch Docs keep Zombify on two Posse, until it's time to Sacrificial Strike one of them (probably after being Revived by Maelok). Maelok makes the other Undead with Death Pact. This limits souls harvested (which doesn't matter against Irusk) and gives a huge ARM swing during Maelok's Feat turn. I have three heavies for dealing with my opponent's armor, but realistically, if he's going warjack heavy, this list will have to rely on Gatormen Posse and Mortality to get work done.
My opponent's list:
Supreme Kommandant Irusk
- War Dog
- Kodiak
- Kodiak
- Destroyer
Man-o-War Drakhun
Man-o-War Kovnik
Widowmaker Marksman
Doom Reaver Swordsmen
- Greylord Escort
Man-o-War Shocktroopers
Widowmaker Scouts
We were playing the Incursion scenario with three obstructions (the two buildings and the large hill) and two forests. Two walls were placed on one table edge. I won the roll, and elected to go second, choosing the side without the walls.
My opponent's deployment, after Advance Deploy placements:
I deployed my three Posse at the edge of my deployment zone. The left side - red Posse (behind the large hill) - was supported by Wrong Eye, the right side - blue Posse (which I assumed was only going to have Widowmakers close) - had the Swamp Gobbers (which I placed REALLY poorly - they should have been in front) and the central - green Posse - had Maelok and his Wrastlers. This would allow me to put pressure on all three flags during my second turn.
Khador - Turn 1:
Irusk activates, casts Energizer, casts Fire For Effect on the Destroyer, and casts Solid Ground. Then advances behind the wall. Both Kodiaks run, filling the hole between the central building and the forest. Doom Reavers run, filling the hole between the two buildings. Drakhun runs up behind the Doom Reavers. Shocktroopers and Kovnik run. Destroyer runs up behind the central building. He forgot to move the Widowmakers and the Marksman, but I let him move them into the forest before I did anything.
Minions - Turn 1:
Well, dang - he's a lot further across the board than I thought he would be. After some measuring, and realizing I was going to get charged no matter what on the left side, I charged the red Posse into the Doom Reavers. Only one makes it (after praying for 2" extra), and he whacked a Doom Reaver. However, the homicidal maniac rolled his Tough check, getting knocked down (he was just out of Irusk's Solid Ground). The Gators' supporting Witch Doc moves up and Zombifies them. On the right flank, I realize my mistake after advancing the Posse - the Gobbers are not going to be able to advance and put down the cloud in front of them. So, they pray for concealment, and the Gobbers move up and put down a cloud anyway. The Witch Doc moves up in the middle of the Gators (don't ask why, total brain fart) and Zombifies them. In retrospect - I should have just run the Gators, but I was worried about the Kodiaks. The green Posse advances cautiously, looking to support either side in anticipation of getting charged. Snapjaw advances, and casts Submerge and riles for three. Wrong Eye moves up, casts Star Crossed and Submerge. Both Wrastlers run (though really I just needed the fury) and Maelok moves up behind them and puts Death Pact on the green Posse.
Khador - Turn 2:
So, the knocked down Doom Reaver rises (didn't see that coming) and the unit charges into the Posse. Thanks to Star Crossed and eight damage boxes, only one dies (though another had to Tough to stay). Irusk moves up behind the building (he had upkept Fire For Effect and Solid Ground), and casts Energizer, moving up next to the building and out of sight. The Destroyer walks around the building and takes a shot at the green Posse. The shot misses (thanks to Dirge of Mists), but scatters into s position to still kill one and wound another. The Widomakers plus Marksmen move to the edge of the forest and take shots at the blue Posse, after killing their supporting Witch Doc (why did I move that guy there?). A Kodiak charges the blue Posse as well, curb stomping the poor guy that he contacts. The second Kodiak charges the green Posse, killing another Gatorman. Drakhun and accompanying Man-o-Wars advance further, and he passes turn.
Minions - Turn 2:
Mistakes are made - that's the theme.
First, before I go into the mistakes made, a little background on me. I have a neurological condition that really affects my ability to concentrate and stay focused. This also affects my memory, and ranges anywhere from really annoying to completely disrupting. While not an excuse for the mistakes made, it does contribute. So if you're reading this (and you don't know me), realize two things - #1 I'm not a hard-core tournament player. Don't get me wrong, I like to win, but this is a social game for me (and it's important). It's one of the few opportunities I have to interact with friends, and I relish every chance I get. #2 I have a hard time remembering everything MY army can do (and frequently forget things many times) - there's no way I'm going to know what my opponent's army does.
So, the Doom Reavers having Rise was a little surprising, as was losing two Posse members from the middle. And the stupid positioning on the Witch Doc AND the Gobbers cost me. Oh well, hopefully I remember better next time. Time to get some work done.
The painted Wrastler charges the Kodiak and proceeds to pound on it. However, I forget to cast Rage (that's the whole reason I bring these guys!) first, so he leaves the Kodiak on a few boxes. Not good, I don't want that guy alive. So the blue Posse charges, praying for distance. I get to the Widowmakers and their Marksman with two of them, and the other two hit the Kodiak. This was unnecessary, one of them put the big guy down. This also ended up being a cheating moment (sorry) as I completely misread the command range on the Posse (I thought it was 8, not 7). Those two guys way out there on the Widowmakers are out of command. :( They kill one of the Widowmakers (I never did realize they were out of command) but whiff on the Marksman.
I'm really wanting to get into the back arcs of those Doom Reavers (and maybe even into the Destroyer) so Maelok moves up, Revives two Gatorman (one in the green Posse, one in the blue) and pops his Feat. The green Posse get ready to move past the Doom Reavers, clearing the way for the Wrastler to the second Kodiak and engaging the Drakhun and Destroyer, when my opponent informs me that Doom Reavers have magical weapons. Ah crap! Ok, change of plans - red Posse activates, moves up and starts whacking Doom Reavers. Half-way through my slaughterfest, my opponent remembers he has Solid Ground up, which means the Tough Doom Reavers aren't getting knocked down. I let him take back the auto-kills and the Posse doesn't do near as well as the first run-through. However, I forgot their prayers - all those misses that could have been hits if I had remembered! Needless to say, the red Posse didn't kill the Doom Reavers, so the green Posse comes in to help. One of the green Posse (the one Revived) engages the Destroyer - which triggers counter-charge on the Drakhun. He can't hurt it, but he can get closer.
The Doom Reavers still survive, so Wrong Eye moves up (this was a bad decision!!). He takes a whack, but the Doom Reaver Toughs. The second Wrastler charges the second Drakhun (I remember Rage this time), but leaves him on just a couple boxes. Snapjaw activates, charges the Kodiak, and puts it down.
Khador - Turn 3:
My opponent wanted to concede here, as he thought he had nothing left, but I talked him into playing it out. He had a lot more left than he realized.
Needing to get shots off, the Widowmakers move away from the Posse engaging them. Both get hit by the free strikes, but the standard Widowmaker makes his Tough roll. What happens here? He can't be knocked down, but he should have been. We played that he stopped moving as soon as he left the front arc of the Gatorman. The Marksman died a horrible, horrible death. The remaining Widowmakers shoot at the blue Posse, killing the Revived one and doing a damage point to the leader.
Irusk dropped Solid Ground, puts Battle Lust on the Man-o-Wars, and pops Feat. Doom Reavers activate, whacking some Posse - including poor Wrong Eye :( However, Wrong Eye Toughs his death roll, keeping him (and Snapjaw) on the table. The Greylord Escort charges the Gator engaging the Destroyer, whacking him (I mismanaged this, I thought I was in the back arc of the Escort) and he Toughs. The Drakhun turns around, rides up, and lays the smackdown onto Snapjaw. The Man-o-Wars activate and charge, doing horrendous damage to the Posse, and more damage onto Snapjaw.
Minions - Turn 3:
Hmm, SPD 2 across the board. That isn't good. The painted Wrastler activates and charges the Drakhun, unhorsing him. The blue Posse get the Press Forward order (run/charge) - two charge the dismounted Drakhun, two run to the flag. It takes both Posse on the Drakhun to kill him, but they get the job done. Snapjaw advances and munches on a Man-o-War and a Doom Reaver, healing Wrong Eye both times. The green Posse activates, whacking a Doom Reaver and the Greylord Escort (the knocked down one stands up and gets his retribution).
Wrong Eye stands up, and whacks at a Man-o-War, doing nothing. I didn't remember to load Snapjaw up on Fury the previous turn, so he only had one. He kept it for transfers. The Witch Doc charges the Man-o-War, killing him. Red Posse members move in to engage the Man-o-Wars, but whiff (I forget to pray again, dang it!). Gobbers run to base the flag, and the silver Wrastler moves 2" towards the Man-o-Wars. Maelok moves up, puts Death Pact on Wrong Eye, and I pass turn.
My opponent concedes again, and this time I don't try to talk him out of it. His army is fairly depleted and Irusk really isn't going to get an assassination (Maelok is sitting on two Fury). He's only got five models left, with a good chunk of my army looking down his throat. And he was clearly frustrated with how things turned out.
Minions victory!
Lessons learned:
- Remember the frickin' prayers!! Gatorman Posse are very versatile, and can do amazing things - but only when you remember their abilities! I think I forgot Snacking half the time, as well. Very frustrating on my part. Also, they are only Command 7 - not 8 like I was playing the whole game.
- I think one of the best features of the new theme list is the +2" deployment. Don't get me wrong, I love 8-box Posse, but being 2" further up the field is really good, too!
- I really like running Wrong Eye. Several times Star Crossed saved Posse members and Snapjaw did good work as well. It would probably be a good idea to drop a Posse in the Barnabas list and add him there as well, but I want to try it with four Posse first.
- Irusk2's Tactician only affects Command range, not Control range - this is much different than we were playing it. Same with Total Obedience. And while his command is 10", that's a lot less than 14" and would have changed several outcomes. But as I said, I have a hard time remembering what my army can do, I depend on my opponent to understand theirs.
Thanks for reading!
Thursday, March 23, 2017
Battle Report #2: Minions (Barnabas) vs Trolls (Doomshaper)
Well, the previous game with the theme list definitely didn't go as planned, but I have a feeling that was much more due to user error than anything else.
I decided again to run Barnabas and only use models I currently own (I think I will be picking more up sooner rather than later). The list contained:
Bloody Barnabas [+28]
- Blackhide Wrastler [16]
- Ironback Spitter [15]
Bog Trog Mist Speaker [4]
Feralgeist [2] (not pictured, because I forgot him originally)
Croak Hunter [0] - bonus model from theme
Gatorman Posse [17]
Gatorman Posse [17]
Croak Raiders [17]
Basically, it's the list I've been running with Barnabas, but now in theme so a few free models. Hopefully, it will do better this time.
My opponent was playing Trollbloods, and running the following:
Hoarluk Doomshaper, Rage of Dhunia
- Dire Troll Blitzer
- Dire Troll Bomber
- Dire Troll Mauler
- Earthborn Dire Troll
- Mulg the Ancient
- Troll Axer
- Winter Troll
Northkin Shaman (free from theme)
Troll Whelps (free from theme)
No picture of these guys.
I face this opponent a lot, so I know how each of the beasts work (I thought) and what the solos will do. However, I've never played against Doomie2 - at least that I can remember - so this is going to be a small problem.
Trollbloods win the roll-off, and choose to go first. I chose to have the same side I had been on. We were playing the Outlast scenario (same as last game), with each zone able to be Controlled for 1 CP or Dominated for 2 CP. The areas with a tree on them were forests, the areas without trees are hills.
My opponent deployed his battlegroup slightly left, with the Shaman behind. The Whelps were not deployed - they were going to be deployed whenever I wounded a Beast. :)
I deployed my battlegroup to the left, with my Gators to the right. My Croak Raiders would Advance Deploy in front of the Gators, while the Croak Hunters Advance Deployed into forest in front of the battlegroup. The Feralgeist and the Mist Speaker deploy close to Barnabas.
Trollbloods - Turn 1:
Everything runs. The Earthborn goes into the edge of the forest, the Mauler, the Bomber, and the Axer behind the wall. Mulg and the Blitzer move around the wall and towards the zone to the left. The Shaman move up behind and put out clouds, hiding Doomie.
Minions - Turn 1:
Feralgeist and Croak Hunters run, toeing the edge of the zone. Wrastler runs into the zone, Spitter runs into the zone, second Spitter runs close to the zone. Croak Raiders run into the right zone, some hiding behind the trees. Both Gator units run up behind the Croaks. Barnabas moves up, casts Warpath and then Death March onto the closest Gator unit.
Trollbloods - Turn 2:
Trolls advance, with Mulg running to toe into the zone. Earthborn stays put. Doomie moves up behind a cloud wall created by the Shaman.
Minions - Turn 2:
Barnabas forgot to rile his warbeasts, so he's only got three Fury. He upkeeps both his spells and only has one Fury. Raiders move around the forest and to the edge of the zone. First one throws an oil gourd onto the Earthborn. The next misses with his Dart, but second hits! And then I find out the Earthborn is immune to fire. That ... hurts. :( The others turn and throw at the Mauler, but since he's behind cover, they all miss.
One squad of Gators move up behind the Croaks, the second (with Death March) move into the trees. Croak Hunters move up and shoot the Blitzer, doing minor damage. Feralgeist runs to engage Mulg (because my mind wasn't functioning and I forgot Incorporeal models aren't roadblocks). Wrastler moves up and riles. Spitter moves up and shoots Mulg, missing. The AOE drifts back onto one of the Shaman, failing to break armor but giving him Corrosion. Mist Speaker then gives the other Spitter Guidance, he walks forward and targets Doomie. Boost the attack roll, hit, boost the damage roll knocks 11 damage off Doomie. Winter Troll gets Corrosion, Shaman gets Corrosion, second Shaman gets Corrosion again :) Barnabas decides to do nothing and stays a long ways back, with his one Fury. Minions score 1.
Trollbloods - Turn 3:
I knew I had missed something when my opponent didn't care that I had scored a point. Northkin Shaman moves up and sprays my right-hand Spitter. Winter Troll moves up and sprays the same Spitter. Bomber casts Far Strike and shoots the Spitter twice (almost killing it). Doomie moves up and Feats (he cast a couple spells, but don't remember which) - he's sitting on one Fury. Earthborn charges into the Raiders, killing half the unit thanks to [Field Marshal: Overtake] from Doomie. Axer puts Rush onto the Mauler, then moves to engage the remaining Croaks, but misses his attack. Mauler charges the almost dead Spitter, killing him on the charge attack. He then moves into the Gators, whiffing on three attacks and finally killing the poor guy on his last swing.
Mulg then activates and charges through the Feralgeist into the Wrastler. After his initial attacks, the Wrastler is dead and he moves into the last Spitter, doing some damage. Then the Blitzer activates, charges the Spitter, and beats him into the ground, shooting at Barnabas in the meantime (doing minimal). He then Overtakes into the Mist Speaker, pulping the innocent bystander. He then tries to Overtake into Barnabas, but is just short. Whew!
No picture taken - too much scary just happened! Score 0-1, advantage Minions.
Minions - Turn 3:
Gatormen move up around the Mauler with Vengeance (from Death March), trying to get out of the woods. Barnabas activates, moves around the Blitzer (but staying in his front arch, since I had to get within 1" in order to get in position) and Feats, knocking everything within 12" (including Doomie) down. He then casts Flesheater at a Northkin Shaman (blocking the only charge lane), killing it. Croak Hunter moves up, hits Doomie, but fails to beat armor (on three dice!). Second Hunter moves up, hits, does good damage but it's transferred to the Winter Troll. Things are getting scary! If I don't get this, Barnabas has two angry Dire Trolls right in front of him. The unit of Posse offers a Predator's Prayer, and charges Doomie. One makes it into 0.5" melee (I wanted two attacks since no others were making it). Autohitting POW13's kill Doomshaper. Victory Minions!
Lessons learned this game:
- Never take anything for granted. Sometimes, what seems far away can get into your face very quickly!
- The list needs to change. With the combined arms approach, I don't think it works well. Going to tinker with it some tonight.
Thanks for reading!
I decided again to run Barnabas and only use models I currently own (I think I will be picking more up sooner rather than later). The list contained:
Bloody Barnabas [+28]
- Blackhide Wrastler [16]
- Ironback Spitter [15]
Bog Trog Mist Speaker [4]
Feralgeist [2] (not pictured, because I forgot him originally)
Croak Hunter [0] - bonus model from theme
Gatorman Posse [17]
Gatorman Posse [17]
Croak Raiders [17]
Basically, it's the list I've been running with Barnabas, but now in theme so a few free models. Hopefully, it will do better this time.
My opponent was playing Trollbloods, and running the following:
Hoarluk Doomshaper, Rage of Dhunia
- Dire Troll Blitzer
- Dire Troll Bomber
- Dire Troll Mauler
- Earthborn Dire Troll
- Mulg the Ancient
- Troll Axer
- Winter Troll
Northkin Shaman (free from theme)
Troll Whelps (free from theme)
No picture of these guys.
I face this opponent a lot, so I know how each of the beasts work (I thought) and what the solos will do. However, I've never played against Doomie2 - at least that I can remember - so this is going to be a small problem.
Trollbloods win the roll-off, and choose to go first. I chose to have the same side I had been on. We were playing the Outlast scenario (same as last game), with each zone able to be Controlled for 1 CP or Dominated for 2 CP. The areas with a tree on them were forests, the areas without trees are hills.
My opponent deployed his battlegroup slightly left, with the Shaman behind. The Whelps were not deployed - they were going to be deployed whenever I wounded a Beast. :)
I deployed my battlegroup to the left, with my Gators to the right. My Croak Raiders would Advance Deploy in front of the Gators, while the Croak Hunters Advance Deployed into forest in front of the battlegroup. The Feralgeist and the Mist Speaker deploy close to Barnabas.
Trollbloods - Turn 1:
Everything runs. The Earthborn goes into the edge of the forest, the Mauler, the Bomber, and the Axer behind the wall. Mulg and the Blitzer move around the wall and towards the zone to the left. The Shaman move up behind and put out clouds, hiding Doomie.
Minions - Turn 1:
Feralgeist and Croak Hunters run, toeing the edge of the zone. Wrastler runs into the zone, Spitter runs into the zone, second Spitter runs close to the zone. Croak Raiders run into the right zone, some hiding behind the trees. Both Gator units run up behind the Croaks. Barnabas moves up, casts Warpath and then Death March onto the closest Gator unit.
Trollbloods - Turn 2:
Trolls advance, with Mulg running to toe into the zone. Earthborn stays put. Doomie moves up behind a cloud wall created by the Shaman.
Minions - Turn 2:
Barnabas forgot to rile his warbeasts, so he's only got three Fury. He upkeeps both his spells and only has one Fury. Raiders move around the forest and to the edge of the zone. First one throws an oil gourd onto the Earthborn. The next misses with his Dart, but second hits! And then I find out the Earthborn is immune to fire. That ... hurts. :( The others turn and throw at the Mauler, but since he's behind cover, they all miss.
One squad of Gators move up behind the Croaks, the second (with Death March) move into the trees. Croak Hunters move up and shoot the Blitzer, doing minor damage. Feralgeist runs to engage Mulg (because my mind wasn't functioning and I forgot Incorporeal models aren't roadblocks). Wrastler moves up and riles. Spitter moves up and shoots Mulg, missing. The AOE drifts back onto one of the Shaman, failing to break armor but giving him Corrosion. Mist Speaker then gives the other Spitter Guidance, he walks forward and targets Doomie. Boost the attack roll, hit, boost the damage roll knocks 11 damage off Doomie. Winter Troll gets Corrosion, Shaman gets Corrosion, second Shaman gets Corrosion again :) Barnabas decides to do nothing and stays a long ways back, with his one Fury. Minions score 1.
Trollbloods - Turn 3:
I knew I had missed something when my opponent didn't care that I had scored a point. Northkin Shaman moves up and sprays my right-hand Spitter. Winter Troll moves up and sprays the same Spitter. Bomber casts Far Strike and shoots the Spitter twice (almost killing it). Doomie moves up and Feats (he cast a couple spells, but don't remember which) - he's sitting on one Fury. Earthborn charges into the Raiders, killing half the unit thanks to [Field Marshal: Overtake] from Doomie. Axer puts Rush onto the Mauler, then moves to engage the remaining Croaks, but misses his attack. Mauler charges the almost dead Spitter, killing him on the charge attack. He then moves into the Gators, whiffing on three attacks and finally killing the poor guy on his last swing.
Mulg then activates and charges through the Feralgeist into the Wrastler. After his initial attacks, the Wrastler is dead and he moves into the last Spitter, doing some damage. Then the Blitzer activates, charges the Spitter, and beats him into the ground, shooting at Barnabas in the meantime (doing minimal). He then Overtakes into the Mist Speaker, pulping the innocent bystander. He then tries to Overtake into Barnabas, but is just short. Whew!
No picture taken - too much scary just happened! Score 0-1, advantage Minions.
Minions - Turn 3:
Gatormen move up around the Mauler with Vengeance (from Death March), trying to get out of the woods. Barnabas activates, moves around the Blitzer (but staying in his front arch, since I had to get within 1" in order to get in position) and Feats, knocking everything within 12" (including Doomie) down. He then casts Flesheater at a Northkin Shaman (blocking the only charge lane), killing it. Croak Hunter moves up, hits Doomie, but fails to beat armor (on three dice!). Second Hunter moves up, hits, does good damage but it's transferred to the Winter Troll. Things are getting scary! If I don't get this, Barnabas has two angry Dire Trolls right in front of him. The unit of Posse offers a Predator's Prayer, and charges Doomie. One makes it into 0.5" melee (I wanted two attacks since no others were making it). Autohitting POW13's kill Doomshaper. Victory Minions!
Lessons learned this game:
- Never take anything for granted. Sometimes, what seems far away can get into your face very quickly!
- The list needs to change. With the combined arms approach, I don't think it works well. Going to tinker with it some tonight.
Thanks for reading!
Battle Report #1: Minions (Barnabas) vs Skorne (Mordikaar)
Well, the theme force for the Blindwater Congregation dropped today, and I just had to try it out. First, I fully realize my list is not optimized, but it was a first run-through and would give me an opportunity to see if I wanted to pursue it further.
For my list, I decided to run Barnabas and only use models I currently own (I think I will be picking more up sooner rather than later). The list contained:
Bloody Barnabas [+28]
- Blackhide Wrastler [16]
- Ironback Spitter [15]
Bog Trog Mist Speaker [4]
Feralgeist [2] (not pictured, because I forgot him originally)
Croak Hunter [0] - bonus model from theme
Gatorman Posse [17]
Gatorman Posse [17]
Croak Raiders [17]
Basically, it's the list I've been running with Barnabas, but now in theme so a few free models. We will see how it turns out.
My opponent was playing Skorne, and running the following:
Void Seer Mordikaar
- Cyclops Savage
- Despoiler
- Titan Cannoneer
- Titan Gladiator
Extoller Soulward
Void Spirit
Cataphract Arcuarii
Praetorian Swordsmen
- Swordsmen Officer & Standard
Paingiver Beast Handlers (min)
I had never faced Mordikaar, and it's going to show very quickly. Definitely a learning experience! ;)
Minions win the roll-off, and I choose to go first. My opponent chose the side with the walls. We were playing the Outlast scenario, with each zone able to be Controlled for 1 CP or Dominated for 2 CP. The areas with a tree on them were forests, the areas without trees are hills.
I deployed my battlegroup centrally, with my Gators to my right and my Croaks (and the Feralgeist) Advanced Deploying into the woods on my left. The idea was the two units of Gators would be able to support themselves/control that zone by themselves and the battlegroup would take the left side, supported by the Croaks. The Mist Speaker was between the Spitters, ready to give support to either.
My opponent deployed his battlegroup central as well, with the Swordsmen to my left (across from where I would place my Croaks - good, because I expected the Croaks to be able to kill a bunch of them) and the Arcuarii to my right.
Minions - Turn 1:
Everything runs. Well, almost everything runs. This is also where I realize I had not deployed the Feralgeist, and my opponent graciously let me put it down behind the Croak Raiders. Everything runs but Barnabas, who put up Warpath on himself and cast Death March on the far Gator unit, then simply advanced.
Skorne - Turn 1:
This is where things started to get interesting. At least, it sets up for things getting interesting. Swordsmen run up the flank, keeping within 6" of a certain spot on the field (I'll find out why in a bit). The two heavy beasts in the middle run up, with their support behind them. Arcuarii move up behind a wall, and the Soulward puts Guidance on the Cannoneer, then moves up. Cannoneer advances, puts Far Strike on himself, and shoots the Gators along the woods. He hits and kills one, and slightly damages another. Then Mordikaar advances and casts Hollow on the Swordsmen (remember that 6" range that was necessary - this is why) and Essence Blast, removing a Swordsmen to spray down a Croak Hunter and a Croak Raider - killing them both. :( He then Feats. Void Spirit runs into the zone.
Minions - Turn 2:
Mordikaar's Feat gives all of his models within 14" of him +3 Def and Poltergeist - not good. However, Barnabas can pop Feat and negate that +3 DEF (knockdown!). After some measuring, though, I decide against it (bad, BAD decision). I can't really catch much in my Feat, so I decide to save it for one turn.
One Spitter stands still, aims, boosts into the Swordsmen and kills two, putting Corrosion on two more. The second Spitter lines up a shoot, aims, boosts and shoots into the Swordsmen but misses. The scatter hits three Swordsmen (killing one) and the Cyclops. They get Corroded and he is then pushed 3" back due to Poltergeist. Barnabas moves up, casts Swamp Pit on the other side of the forest (he upkept Death March and Warpath) and camped two. The Mist Speaker moves up in front of Barnabas, putting out his cloud. Gators move into the zone (the four man unit into the Swamp to avoid being shot) and the Croak Raiders run to engage all of the Swordsmen (I figure some would survive the inevitable attacks).
Skorne - Turn 2:
With all the souls Mordikaar reaped from last turn (remember Hollow? Yeah, killing dudes is not a good idea), he is sitting on 12 Fury (thanks to two more dieing from Corrosion). However, this is unnecessary. Swordsmen kill and clear a few of the Croak Raiders, and then the Cannoneer gets Guidance from the Soulward again. Turning, he casts Far Strike, aims, and calmly shoots my Mist Speaker off the board - this is bad because that was the protection for Barnabas!
First the Cyclops come charging in, then the Despoiler come charging in, and the end result is Barnabas lying on his face in the mud, playing dead until the big, bad elephants go away and let him lick his wounds.
Result: Skorne victory through assassination
Lessons learned:
- Even if it's not going to catch the whole opposing army, use Barnabas' Feat! Knocking everything close down would have limited what he could have done. Or stay back - things can go a long ways in this game. If you are going to commit to being up close and personal, multiple layers of protection are necessary.
- Either play aggressive or play defensive, don't try to do both at the same time. And really, aggressive would have most likely been a better bet.
- If you've never played against the 'caster, take a moment and look at their cards. Both the Hollow spell and his Feat really surprised me. But what really got me was ignoring Guidance that second time - I know about it ignoring clouds, so should realized that Cannoneer would shoot the Mist Speaker.
Thanks for reading!
For my list, I decided to run Barnabas and only use models I currently own (I think I will be picking more up sooner rather than later). The list contained:
Bloody Barnabas [+28]
- Blackhide Wrastler [16]
- Ironback Spitter [15]
Bog Trog Mist Speaker [4]
Feralgeist [2] (not pictured, because I forgot him originally)
Croak Hunter [0] - bonus model from theme
Gatorman Posse [17]
Gatorman Posse [17]
Croak Raiders [17]
Basically, it's the list I've been running with Barnabas, but now in theme so a few free models. We will see how it turns out.
My opponent was playing Skorne, and running the following:
Void Seer Mordikaar
- Cyclops Savage
- Despoiler
- Titan Cannoneer
- Titan Gladiator
Extoller Soulward
Void Spirit
Cataphract Arcuarii
Praetorian Swordsmen
- Swordsmen Officer & Standard
Paingiver Beast Handlers (min)
I had never faced Mordikaar, and it's going to show very quickly. Definitely a learning experience! ;)
Minions win the roll-off, and I choose to go first. My opponent chose the side with the walls. We were playing the Outlast scenario, with each zone able to be Controlled for 1 CP or Dominated for 2 CP. The areas with a tree on them were forests, the areas without trees are hills.
I deployed my battlegroup centrally, with my Gators to my right and my Croaks (and the Feralgeist) Advanced Deploying into the woods on my left. The idea was the two units of Gators would be able to support themselves/control that zone by themselves and the battlegroup would take the left side, supported by the Croaks. The Mist Speaker was between the Spitters, ready to give support to either.
My opponent deployed his battlegroup central as well, with the Swordsmen to my left (across from where I would place my Croaks - good, because I expected the Croaks to be able to kill a bunch of them) and the Arcuarii to my right.
Minions - Turn 1:
Everything runs. Well, almost everything runs. This is also where I realize I had not deployed the Feralgeist, and my opponent graciously let me put it down behind the Croak Raiders. Everything runs but Barnabas, who put up Warpath on himself and cast Death March on the far Gator unit, then simply advanced.
Skorne - Turn 1:
This is where things started to get interesting. At least, it sets up for things getting interesting. Swordsmen run up the flank, keeping within 6" of a certain spot on the field (I'll find out why in a bit). The two heavy beasts in the middle run up, with their support behind them. Arcuarii move up behind a wall, and the Soulward puts Guidance on the Cannoneer, then moves up. Cannoneer advances, puts Far Strike on himself, and shoots the Gators along the woods. He hits and kills one, and slightly damages another. Then Mordikaar advances and casts Hollow on the Swordsmen (remember that 6" range that was necessary - this is why) and Essence Blast, removing a Swordsmen to spray down a Croak Hunter and a Croak Raider - killing them both. :( He then Feats. Void Spirit runs into the zone.
Minions - Turn 2:
Mordikaar's Feat gives all of his models within 14" of him +3 Def and Poltergeist - not good. However, Barnabas can pop Feat and negate that +3 DEF (knockdown!). After some measuring, though, I decide against it (bad, BAD decision). I can't really catch much in my Feat, so I decide to save it for one turn.
One Spitter stands still, aims, boosts into the Swordsmen and kills two, putting Corrosion on two more. The second Spitter lines up a shoot, aims, boosts and shoots into the Swordsmen but misses. The scatter hits three Swordsmen (killing one) and the Cyclops. They get Corroded and he is then pushed 3" back due to Poltergeist. Barnabas moves up, casts Swamp Pit on the other side of the forest (he upkept Death March and Warpath) and camped two. The Mist Speaker moves up in front of Barnabas, putting out his cloud. Gators move into the zone (the four man unit into the Swamp to avoid being shot) and the Croak Raiders run to engage all of the Swordsmen (I figure some would survive the inevitable attacks).
Skorne - Turn 2:
With all the souls Mordikaar reaped from last turn (remember Hollow? Yeah, killing dudes is not a good idea), he is sitting on 12 Fury (thanks to two more dieing from Corrosion). However, this is unnecessary. Swordsmen kill and clear a few of the Croak Raiders, and then the Cannoneer gets Guidance from the Soulward again. Turning, he casts Far Strike, aims, and calmly shoots my Mist Speaker off the board - this is bad because that was the protection for Barnabas!
First the Cyclops come charging in, then the Despoiler come charging in, and the end result is Barnabas lying on his face in the mud, playing dead until the big, bad elephants go away and let him lick his wounds.
Result: Skorne victory through assassination
Lessons learned:
- Even if it's not going to catch the whole opposing army, use Barnabas' Feat! Knocking everything close down would have limited what he could have done. Or stay back - things can go a long ways in this game. If you are going to commit to being up close and personal, multiple layers of protection are necessary.
- Either play aggressive or play defensive, don't try to do both at the same time. And really, aggressive would have most likely been a better bet.
- If you've never played against the 'caster, take a moment and look at their cards. Both the Hollow spell and his Feat really surprised me. But what really got me was ignoring Guidance that second time - I know about it ignoring clouds, so should realized that Cannoneer would shoot the Mist Speaker.
Thanks for reading!
Subscribe to:
Posts (Atom)